
Before we start this Tutorial, please have OREMO downloaded! For the sake of this tutorial, I will be using an English version. I couldn't seem to find a download to it on the web, so for now here is the Japanese version. I'll edit this with the download to the English version as soon as I find it!
----
So, welcome to this Basic OREMO tutorial! Upon completion of this tutorial, you will (hopefully) know: How to record samples with OREMO, How to load a reclist, How to load GuideBGM, How to change audio input and output, and How to open the Pitch guide.
----
First, let's open a new OREMO window. What you should see is this-
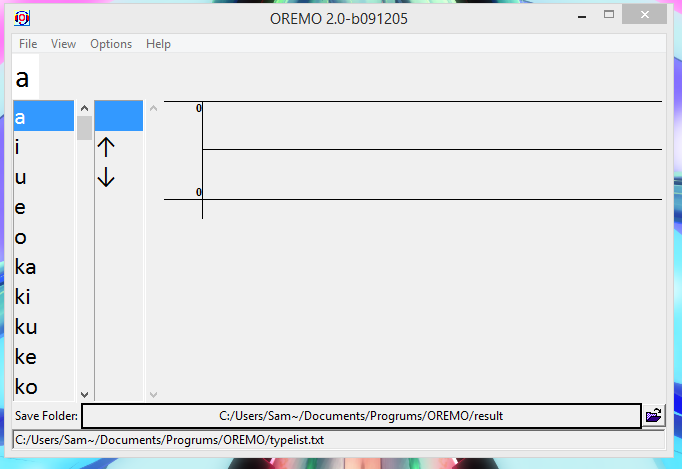
Let's go over the basic things in this window.
Over to the very left, you have the Reclist. This tells OREMO what to name your WAV file, as well as telling you what to record. I will show you how to select your own reclist later.
Next to the Reclist you have the Typelist. This tells OREMO what Suffix to put on your WAV files.
For instance, if you had "a" selected in the Reclist and "↑" selected in the Typelist, the output file would be "a↑.wav".
Next over to the right, we have the Main Recording Area. This shows you the Waveform of your recording as you record it and afterwards.
Below the Reclist, Typelist, and Main Recording Area, we have a little section that shows us our paths. On the bottom, where it says "C:/Users/Sam~/Documents/Progrums/OREMO/typelist.txt", it is showing us where our Typelist is coming from. Above it, in the rectangle outlined in black, it shows us where our files will be saved. You can click on the blue folder icon to the right of the outline to select a new save folder, but it is set to OREMO/result by default.
And finally, on the very top of the window we have the toolbar. This gives you your main options such as File, Edit, et cetera. In OREMO, the options are File, View, Options, and Help.
Alright, let's go over what's under each of the options in the toolbar.
-File: Change Save Folder, Load RecordList, Save RecordList, Load TypeList, Create a new RecordList for WAV files, Save current configuration, and Exit.
-View: Show Spectrum, Show Power, Show F0, Show Pitch Guide, and Show Tempo Guide.
-Options: Remove DC Components After Recording, Show BGM Guide, Audio I/O settings, and Settings.
-Help: Online Help, and Version.
In this tutorial we won't be going over every single option, mainly just the Save folder, RecordList, TypeList, Pitch Guide, Audio I/O, and BGM Guide, respectively.
I: Loading a New RecordList (Reclist)
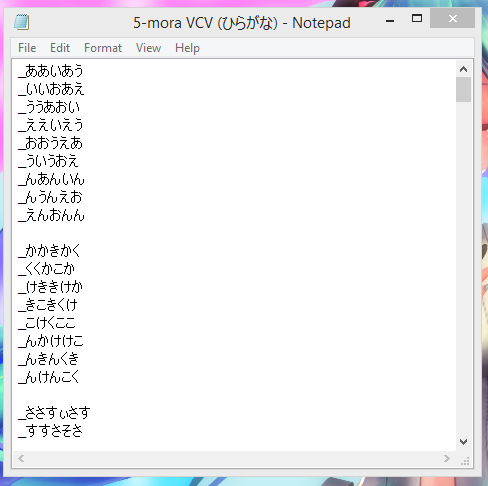
The first thing I will show how to do is get a new reclist loaded. Go to File > Load RecordList and select a new Reclist to load. NOTE: Reclist must be in .txt format!
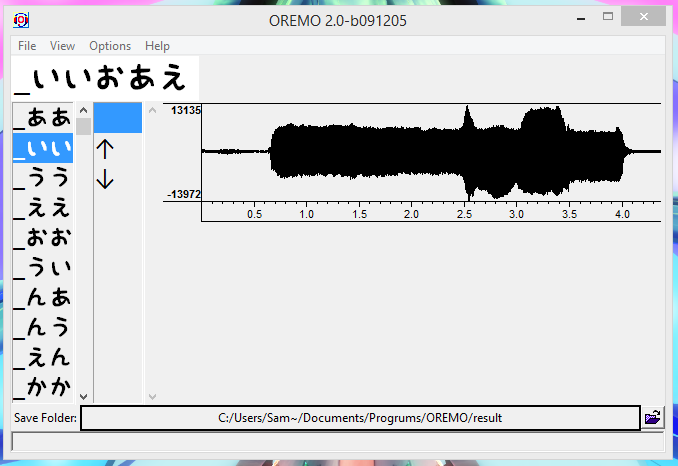
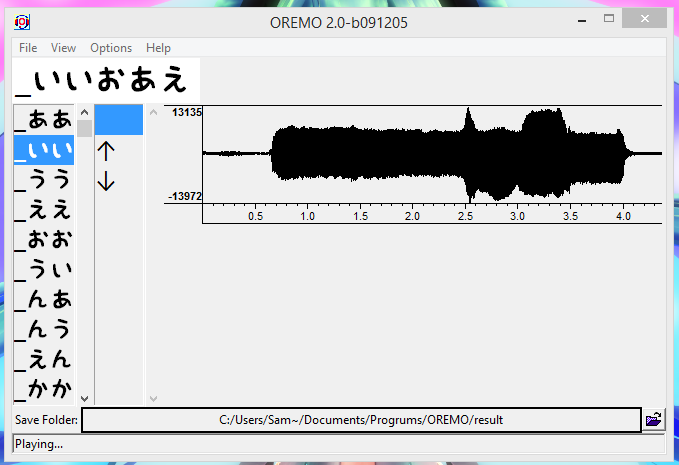
Now, here's what the window looks like after I load a 5Mora Hiragana VCV list-
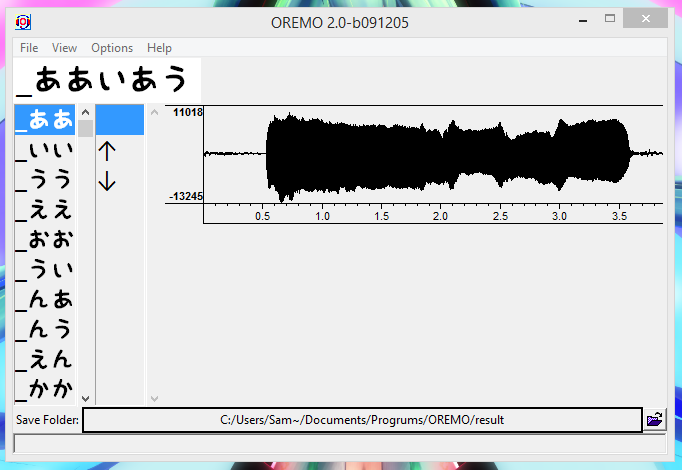
Note: Your window probably will not have the Waveform in the Main Recording Area, that is from a recording session of mine a few weeks ago.
Now, you see that the values in the Reclist area have changed. They correspond with the .txt file I loaded-
You do the same thing to load a new Typelist, except you click "Load TypeList" instead of "Load RecordList". I will not demonstrate this since it is basically the same as what I just did, and the only Typelist I have on my computer is the one that came with OREMO, haha.
Next, let's move on to Recording.
Before Recording however, please make sure that you have correct Audio I/O settings beforehand or your samples may not be recorded the way you were expecting.

This is how I usually have my Audio I/O settings, except the option that says Wave Mapper is generally set to my Yeti stereo mic.
Alright, on to recording! First, X out of the Audio I/O configuration window so that you are back at the main OREMO window. To record, you press and hold the "R" key on your keyboard, and release when you are finished.
You can also set it up to automatically move from sample to sample, although I haven't really messed around with that feature much.
As you go to the next item in the Reclist, the one you just recorded is saved.
Now I'm on the second item, so what I just recorded was saved in the Result folder.
If you'd like to playback your sample, simply press the Spacebar. You will see "Playing" in the bottom right corner if it is playing, and if you don't hear sound, go check your Audio I/O settings again or make sure your volume is turned up so you can hear it.
Moving on to BGM Guide (Also known as GuideBGM) and the Pitch Guide.
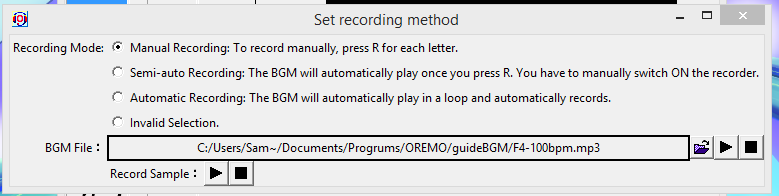
This is the GuideBGM window. I got to it by going to Options > Show BGM Guide. In the Black Outlined Rectangle, you see the BGM file that is selected. You can play it by pressing the Play button to the right (in between the blue folder and the Stop button)
GuideBGM is especially helpful for recording VCV or another style where recording on tempo is critical. Basically it just plays happy music that keeps you on tempo while you record. How nice!
Go ahead and X out of the GuideBGM window now, and navigate to View > Show Pitch Guide. You should now see this-
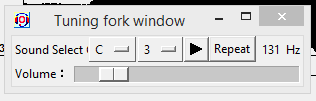
This function is pretty self explanatory, but I'll go over it anyways. If you click the button that currently says C, you can select a note. If you click the button that currently says 3, you can pick the octave. And the Volume slider adjusts the volume.
Click on the Play button, and you'll hear a tone. You can use this to make sure all of your recordings are on the same pitch. Go ahead and X out of this window now.
Well, that about sums up this tutorial now!
If there's something you'd like to know, post in the Discussion for this resource and I'll try to help you as best as I can!
Thank you for reading, and good luck!

----
So, welcome to this Basic OREMO tutorial! Upon completion of this tutorial, you will (hopefully) know: How to record samples with OREMO, How to load a reclist, How to load GuideBGM, How to change audio input and output, and How to open the Pitch guide.
----
First, let's open a new OREMO window. What you should see is this-
Let's go over the basic things in this window.
Over to the very left, you have the Reclist. This tells OREMO what to name your WAV file, as well as telling you what to record. I will show you how to select your own reclist later.
Next to the Reclist you have the Typelist. This tells OREMO what Suffix to put on your WAV files.
For instance, if you had "a" selected in the Reclist and "↑" selected in the Typelist, the output file would be "a↑.wav".
Next over to the right, we have the Main Recording Area. This shows you the Waveform of your recording as you record it and afterwards.
Below the Reclist, Typelist, and Main Recording Area, we have a little section that shows us our paths. On the bottom, where it says "C:/Users/Sam~/Documents/Progrums/OREMO/typelist.txt", it is showing us where our Typelist is coming from. Above it, in the rectangle outlined in black, it shows us where our files will be saved. You can click on the blue folder icon to the right of the outline to select a new save folder, but it is set to OREMO/result by default.
And finally, on the very top of the window we have the toolbar. This gives you your main options such as File, Edit, et cetera. In OREMO, the options are File, View, Options, and Help.
Alright, let's go over what's under each of the options in the toolbar.
-File: Change Save Folder, Load RecordList, Save RecordList, Load TypeList, Create a new RecordList for WAV files, Save current configuration, and Exit.
-View: Show Spectrum, Show Power, Show F0, Show Pitch Guide, and Show Tempo Guide.
-Options: Remove DC Components After Recording, Show BGM Guide, Audio I/O settings, and Settings.
-Help: Online Help, and Version.
In this tutorial we won't be going over every single option, mainly just the Save folder, RecordList, TypeList, Pitch Guide, Audio I/O, and BGM Guide, respectively.
I: Loading a New RecordList (Reclist)
The first thing I will show how to do is get a new reclist loaded. Go to File > Load RecordList and select a new Reclist to load. NOTE: Reclist must be in .txt format!
Now, here's what the window looks like after I load a 5Mora Hiragana VCV list-
Note: Your window probably will not have the Waveform in the Main Recording Area, that is from a recording session of mine a few weeks ago.
Now, you see that the values in the Reclist area have changed. They correspond with the .txt file I loaded-
You do the same thing to load a new Typelist, except you click "Load TypeList" instead of "Load RecordList". I will not demonstrate this since it is basically the same as what I just did, and the only Typelist I have on my computer is the one that came with OREMO, haha.
Next, let's move on to Recording.
Before Recording however, please make sure that you have correct Audio I/O settings beforehand or your samples may not be recorded the way you were expecting.
This is how I usually have my Audio I/O settings, except the option that says Wave Mapper is generally set to my Yeti stereo mic.
Alright, on to recording! First, X out of the Audio I/O configuration window so that you are back at the main OREMO window. To record, you press and hold the "R" key on your keyboard, and release when you are finished.
You can also set it up to automatically move from sample to sample, although I haven't really messed around with that feature much.
As you go to the next item in the Reclist, the one you just recorded is saved.
Now I'm on the second item, so what I just recorded was saved in the Result folder.
If you'd like to playback your sample, simply press the Spacebar. You will see "Playing" in the bottom right corner if it is playing, and if you don't hear sound, go check your Audio I/O settings again or make sure your volume is turned up so you can hear it.
Moving on to BGM Guide (Also known as GuideBGM) and the Pitch Guide.
This is the GuideBGM window. I got to it by going to Options > Show BGM Guide. In the Black Outlined Rectangle, you see the BGM file that is selected. You can play it by pressing the Play button to the right (in between the blue folder and the Stop button)
GuideBGM is especially helpful for recording VCV or another style where recording on tempo is critical. Basically it just plays happy music that keeps you on tempo while you record. How nice!
Go ahead and X out of the GuideBGM window now, and navigate to View > Show Pitch Guide. You should now see this-
This function is pretty self explanatory, but I'll go over it anyways. If you click the button that currently says C, you can select a note. If you click the button that currently says 3, you can pick the octave. And the Volume slider adjusts the volume.
Click on the Play button, and you'll hear a tone. You can use this to make sure all of your recordings are on the same pitch. Go ahead and X out of this window now.
Well, that about sums up this tutorial now!
If there's something you'd like to know, post in the Discussion for this resource and I'll try to help you as best as I can!
Thank you for reading, and good luck!
