Wavetone is a tool that does a graphical representation of the frequencies of a sound file, lets us draw midi notes directly on top of their related notes and then export the result as a midi file.
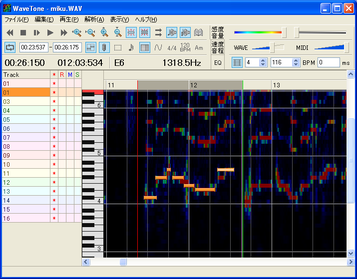
(Typical wavetone use)
To download the program go to:
http://ackiesound.ifdef.jp/soko.html#wtbeta
Download WaveTone ver.2.6beta5. It works fine even if it's called beta.
It's a portable aplication so you just need to uncompress the contents of the zip and run the executable.
(The program needs extra files to use ogg and wma files but it's easier to just use wav and mp3 -usable by default- and convert other files to those formats with an external program if needed.)
First start the program. We're going to change a little property of the program in order to have a better compability with UTAU.
Go to (F)->(P)
[*Note: That means in the menu locate the option with (F) that is ファイル(F) and in its pop-up menu choose the one with (P) that is 解析データのプロパティ(P)]
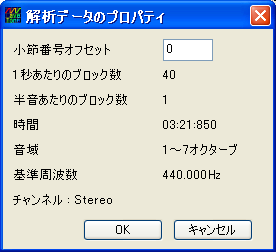
Make sure the top box has a zero like in the picture and press OK.
-Zero there is how UTAU is configured to work.-
After getting the program we need a sound file that will be the basis of our midi.
A full song is usable but it's way easier to use a vocal-only file as the required frequencies will be easier to locate.
Let me upload a small .mp3 as example, so you can test the program with it right now:
http://www.mediafire.com/listen/10n0p23tvk1k0k3/iso-Pmikuexample.mp3
(It's a small fragment of "The Brush of Our Sleeves Too Must Be Destiny", song by iso-P.
http://y2u.be/5_pCOxkk1U4 )
First open wavetone. You can use (F)->(O) to open a file but it's just faster to drop the sound file into the program window, so I'll drop the .mp3 inside wavetone.
A pop up window appears.
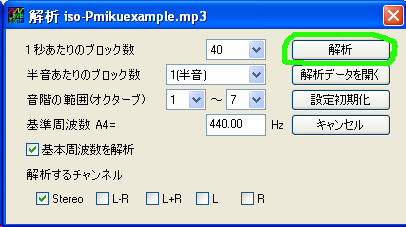
Click the button I marked and wait until the program ends procesing the frequencies (it may take a while for longer sound files).
I suggest you enable the options I mark in this picture:
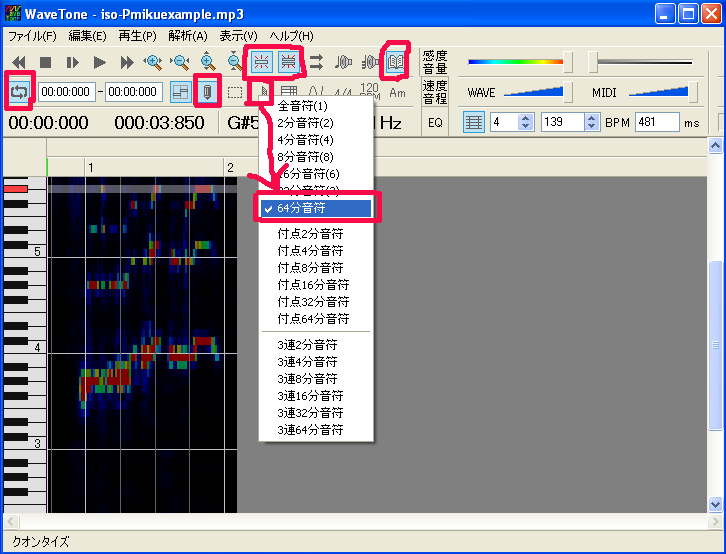
The two icons of horizontal lines of the top enables the highlighting of harmonic partials (I think they're that). Just note that only the lowest of those notes is the one you want for the midi.
The book enables the display to autoscroll when playing.
The circle of arrows is for the loop thing, uh. It's useful for when you want to check a small selected zone.
The pencil enables the writing of midi notes. If you only want to select them then enable the dotted square of its right.
The last button is the music note. It changes the size of the notes to draw. I like maximum precision so I choose the 1/64 but feel free to select an higher size if you don't need that much of finesse.
You may want to change the tempo. Just write the number in the BPM box.
Now, you can tap the tempo instead of directly writing a number:
1.-Press the play button to start the song.
2.-While holding shift, press space for each beat.
The tempo and the starting point(the box to the right of the tempo) will change acording to your rithm.
I like to make the starting point zero manually afterwards so the midi has the same starting point as the mp3.
Now an important thing: SAVE!
Wavetone uses .wfd to save both the picture of the frequencies (so you don't need to precess everything again) and all the progress you made with the midi.
As you CAN'T re-import a midi into the program it's really important to keep these files updated with your work.
To save:
(F)->(S)->Choose the same folder as the .mp3.
If you want to make a "save as..." use (F)->(A) instead.
It's recomendable to choose the same folder as the music file because when you load it loads automatically the sound file if present.
To load a saved project just drop into wavetone the .wfd file or use (F)->(O).
Click "yes" in the warning as it loads the music file so you can hear it.
To make the notes that'll for the midi:
With the pencil button on just draw the notes into the piano roll.
That's it.
Remember to save your progress with the .wfd.
The final step is to render the midi.
Note that you can't re-import midi so this must be the absolute final step. Just in case be sure to save the .wfd.
To render the midi:
(F)->(M)->Choose the location and name of the newly formed midi.
And that's all for now. This new midi can be imported into UTAU (you're using chanel 1 as default). Inside UTAU you'll add the lyrics and add pitchbends that you can graphically gasp from the representation inside wavetone.
And here I'll end this very brief introduction to use wavetone as start for making a midi for a ust.
For another tutorial I'll leave the use of some tricks like use of multiple channels, changing the speed of reproduction to fine-tune the position of the note and how to traslate pitchbends.
(Typical wavetone use)
To download the program go to:
http://ackiesound.ifdef.jp/soko.html#wtbeta
Download WaveTone ver.2.6beta5. It works fine even if it's called beta.
It's a portable aplication so you just need to uncompress the contents of the zip and run the executable.
(The program needs extra files to use ogg and wma files but it's easier to just use wav and mp3 -usable by default- and convert other files to those formats with an external program if needed.)
First start the program. We're going to change a little property of the program in order to have a better compability with UTAU.
Go to (F)->(P)
[*Note: That means in the menu locate the option with (F) that is ファイル(F) and in its pop-up menu choose the one with (P) that is 解析データのプロパティ(P)]
Make sure the top box has a zero like in the picture and press OK.
-Zero there is how UTAU is configured to work.-
After getting the program we need a sound file that will be the basis of our midi.
A full song is usable but it's way easier to use a vocal-only file as the required frequencies will be easier to locate.
Let me upload a small .mp3 as example, so you can test the program with it right now:
http://www.mediafire.com/listen/10n0p23tvk1k0k3/iso-Pmikuexample.mp3
(It's a small fragment of "The Brush of Our Sleeves Too Must Be Destiny", song by iso-P.
http://y2u.be/5_pCOxkk1U4 )
First open wavetone. You can use (F)->(O) to open a file but it's just faster to drop the sound file into the program window, so I'll drop the .mp3 inside wavetone.
A pop up window appears.
Click the button I marked and wait until the program ends procesing the frequencies (it may take a while for longer sound files).
I suggest you enable the options I mark in this picture:
The two icons of horizontal lines of the top enables the highlighting of harmonic partials (I think they're that). Just note that only the lowest of those notes is the one you want for the midi.
The book enables the display to autoscroll when playing.
The circle of arrows is for the loop thing, uh. It's useful for when you want to check a small selected zone.
The pencil enables the writing of midi notes. If you only want to select them then enable the dotted square of its right.
The last button is the music note. It changes the size of the notes to draw. I like maximum precision so I choose the 1/64 but feel free to select an higher size if you don't need that much of finesse.
You may want to change the tempo. Just write the number in the BPM box.
Now, you can tap the tempo instead of directly writing a number:
1.-Press the play button to start the song.
2.-While holding shift, press space for each beat.
The tempo and the starting point(the box to the right of the tempo) will change acording to your rithm.
I like to make the starting point zero manually afterwards so the midi has the same starting point as the mp3.
Now an important thing: SAVE!
Wavetone uses .wfd to save both the picture of the frequencies (so you don't need to precess everything again) and all the progress you made with the midi.
As you CAN'T re-import a midi into the program it's really important to keep these files updated with your work.
To save:
(F)->(S)->Choose the same folder as the .mp3.
If you want to make a "save as..." use (F)->(A) instead.
It's recomendable to choose the same folder as the music file because when you load it loads automatically the sound file if present.
To load a saved project just drop into wavetone the .wfd file or use (F)->(O).
Click "yes" in the warning as it loads the music file so you can hear it.
To make the notes that'll for the midi:
With the pencil button on just draw the notes into the piano roll.
That's it.
Remember to save your progress with the .wfd.
The final step is to render the midi.
Note that you can't re-import midi so this must be the absolute final step. Just in case be sure to save the .wfd.
To render the midi:
(F)->(M)->Choose the location and name of the newly formed midi.
And that's all for now. This new midi can be imported into UTAU (you're using chanel 1 as default). Inside UTAU you'll add the lyrics and add pitchbends that you can graphically gasp from the representation inside wavetone.
And here I'll end this very brief introduction to use wavetone as start for making a midi for a ust.
For another tutorial I'll leave the use of some tricks like use of multiple channels, changing the speed of reproduction to fine-tune the position of the note and how to traslate pitchbends.
