idk if I'm doing this right but we will see!
Have you ever found yourself getting frustrated with an UTAU cover solely because the mix sounds off, or it doesn't sound like the voicebank is fitting into the song just right? Hopefully, you can find this resource in your favor!
NOTE: This guide and guides after this will be made using FL Studio 2024 as the token DAW. However, mixing information and vocabulary are almost entirely universal. If you still find yourself struggling with or not understanding a portion or portions of this resource, please let me know!
NOTE 2: This guide is made off of my personal knowledge of mixing and is not governed by professional experience. If you are curious to my skill set in mixing, you can find an example from one of my covers here!
Starting out, here are a few things to note!
1. Mixing is entirely subjective and can sound good to one person and bad to another! Please do whatever your heart desires!
2. Learning the In's and Out's of mixing can be very time consuming. I implore you to do your own research if you wish to expand further on mixing!
AND
3. This guide is not meant to be interpreted as "THE WAY TO MIX UTAU". Please experiment and ask for criticism when you're stuck in a rut!
Visuals:
Left: General Visual breakdown of the EQ interface with recommended actions notated
Right: General Visual representation of the left visuals notes.


Please note that when you compress an UTAU, if the bank has engine noise, it may be amplified!
Compression can be a daunting part of mixing as it can make or break the cover, but use the simple guide listed below to have a somewhat "safer" compression for your mixes!
Visuals:
FL Studio's Fruity Compressor (Below)

I will attach a small visual to help
Visuals:
FL Studio's "Fruity Limiter"

Unfortunately, FL Studio does not have a stock De-Esser or equivalent that I personally find useful, so I use digitalfishphones SPITFISH .vst! It's a super beginner-friendly vst plugin that works amazingly! I will include my typical settings for SPITFISH in the visuals
Please Follow Image-Lines tutorial on how to install plugins if you are not familiar with installing vst plugins into FL Studio
Visuals:
SPITFISH by digitalfishphones

A general rule of thumb when using reverb is that you want it to have it somewhat similar to the original songs reverb. This mental note has helped me so much.
I won't be including a reverb visual or guide since it's one of the more subjective parts of a mix. However, if you would like a personal suggestion on a mix you are working on, please feel free to reach out to me!
Mixing is hard, but it doesn't always have to be. I hope this guide has helped you in some way shape or form! If you would like a specific tutorial on certain mixing processes, I am more than happy to do so!
Thank you all!
- Ex Vivo
【HOW TO MAKE A GENERAL MIX FOR YOUR UTAU COVERS】
Have you ever found yourself getting frustrated with an UTAU cover solely because the mix sounds off, or it doesn't sound like the voicebank is fitting into the song just right? Hopefully, you can find this resource in your favor!
NOTE: This guide and guides after this will be made using FL Studio 2024 as the token DAW. However, mixing information and vocabulary are almost entirely universal. If you still find yourself struggling with or not understanding a portion or portions of this resource, please let me know!
NOTE 2: This guide is made off of my personal knowledge of mixing and is not governed by professional experience. If you are curious to my skill set in mixing, you can find an example from one of my covers here!
Starting out, here are a few things to note!
1. Mixing is entirely subjective and can sound good to one person and bad to another! Please do whatever your heart desires!
2. Learning the In's and Out's of mixing can be very time consuming. I implore you to do your own research if you wish to expand further on mixing!
AND
3. This guide is not meant to be interpreted as "THE WAY TO MIX UTAU". Please experiment and ask for criticism when you're stuck in a rut!
Step One: Equalization
Equalizing, or EQ'ing, is the process of enhancing and diminishing certain frequencies of a voice! It's one of the most important steps to mixing, and is also one of the most difficult to understand for some, but fear not! I have come to help you understand it at a basic level!Visuals:
Left: General Visual breakdown of the EQ interface with recommended actions notated
Right: General Visual representation of the left visuals notes.
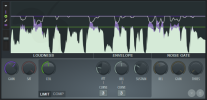
Step Two: Compression
Compressing is the process of making the voices volume more consistent! What it basically does is maked the loud parts quieter, and the quiet parts louder! This prevents distortion in the voice, and ensures that almost all parts of the voice are audible.Please note that when you compress an UTAU, if the bank has engine noise, it may be amplified!
Compression can be a daunting part of mixing as it can make or break the cover, but use the simple guide listed below to have a somewhat "safer" compression for your mixes!
Visuals:
FL Studio's Fruity Compressor (Below)
Step Three: Limiter
"Limiting: a vocal is quite simple; it prevents the voice from reaching past a set threshold (typically in dBs). I typically set my Limiter's threshold to -0.0dB, and then will add gain to balance the voice's volume with the instrumentals! This is one of the simplest and fastest steps to get through, and can really help save your mix!I will attach a small visual to help
Visuals:
FL Studio's "Fruity Limiter"
Step Four: De-Essing
De-essing is one of the most crucial parts (in my personal opinion) to a smooth and buttery mix! It detects the harsh sibilant frequencies (think of the "SH", "S", and "T" sounds in a voice) and reduces their volume, making the voice feel much more controlled.Unfortunately, FL Studio does not have a stock De-Esser or equivalent that I personally find useful, so I use digitalfishphones SPITFISH .vst! It's a super beginner-friendly vst plugin that works amazingly! I will include my typical settings for SPITFISH in the visuals
Please Follow Image-Lines tutorial on how to install plugins if you are not familiar with installing vst plugins into FL Studio
Visuals:
SPITFISH by digitalfishphones
Final Step: Reverb
Reverb can be one of the hardest things to use in a cover, and that's because of its unique capabilities. You can make it short, you can make it long, you can make it echoey, you can make it funky! The possibilities are endless..... and sometimes overwhelming.A general rule of thumb when using reverb is that you want it to have it somewhat similar to the original songs reverb. This mental note has helped me so much.
I won't be including a reverb visual or guide since it's one of the more subjective parts of a mix. However, if you would like a personal suggestion on a mix you are working on, please feel free to reach out to me!
Conclusion
Mixing is hard, but it doesn't always have to be. I hope this guide has helped you in some way shape or form! If you would like a specific tutorial on certain mixing processes, I am more than happy to do so!
Thank you all!
- Ex Vivo