
COEIROINK is a free AI text-to-speech program for the Japanese language created by Shirowani-san. Similar programs that you may have heard of before include VOICEROID, CoeFont, VOICEVOX, A.I.VOICE, TalQ, and so on. Currently there is no translated version of COEIROINK, so this guide aims to casually introduce this program to the English speaking audience.
As a simple hobbyist, I will not be going too much into specifics of things like the terms of service, codes, and such. These topics that are omitted are either things I am not that knowledgeable about or things that can be better understood by directly translating the official website. Additionally, this guide will be more directed at Windows users. I do not have a Mac, but some of this guide should still be followable for those who do.
This first part will be about downloading and navigating the COEIROINK program itself.
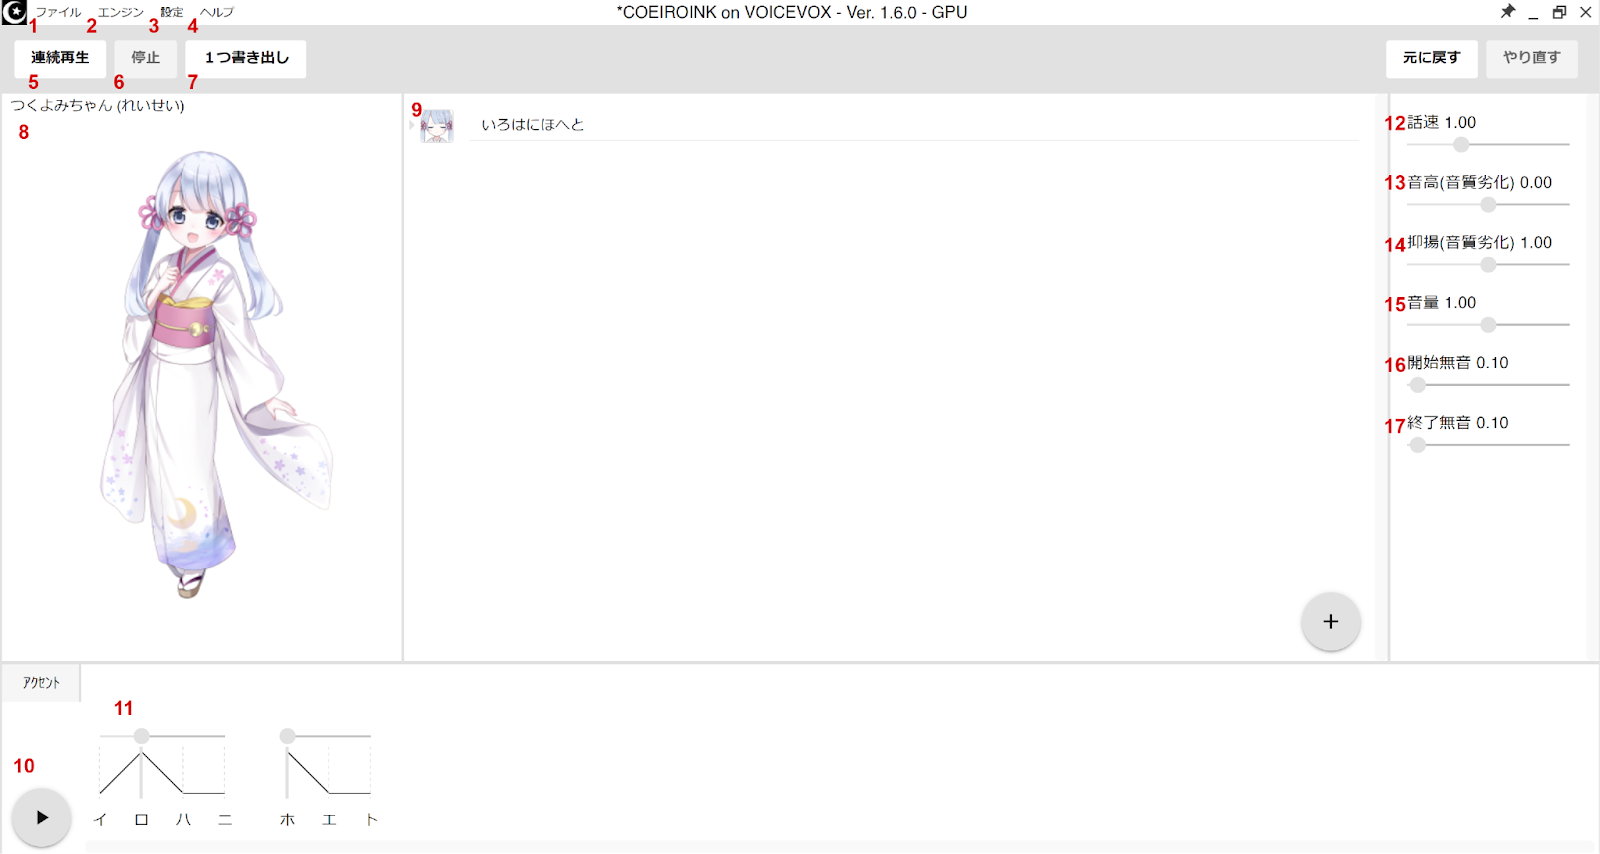
1. File -view section below for options in this menu
2. Engine -shouldn’t need to touch this
3. Settings -view section below for options in this menu
4. Help
5. Play consecutive lines -will render and playback consecutive lines from the currently selected line
6. Stop -stops playback
7. Export 1 line -exports currently selected line as a .wav file
8. Character standing art and info -the model’s name and version should appear here
9. Input -this is where you can write lines for the model to say. Press the plus button in the corner to add additional lines
10. Play -plays the currently selected line
11. Accent -shows and allows editing of which sounds are grouped together and which sound is accented
12. Speaking speed -adjust how fast the line is spoken
13. Pitch -adjust the pitch of the voice for the line
14. Intonation -changes the tone. When it’s lower it sounds colder/more stern and when it’s higher it sounds brighter/warmer
15. Volume
16. Pause before line -adjust how long the voice pauses before the line
17. Pause after line -adjust how long the voice pauses after the line
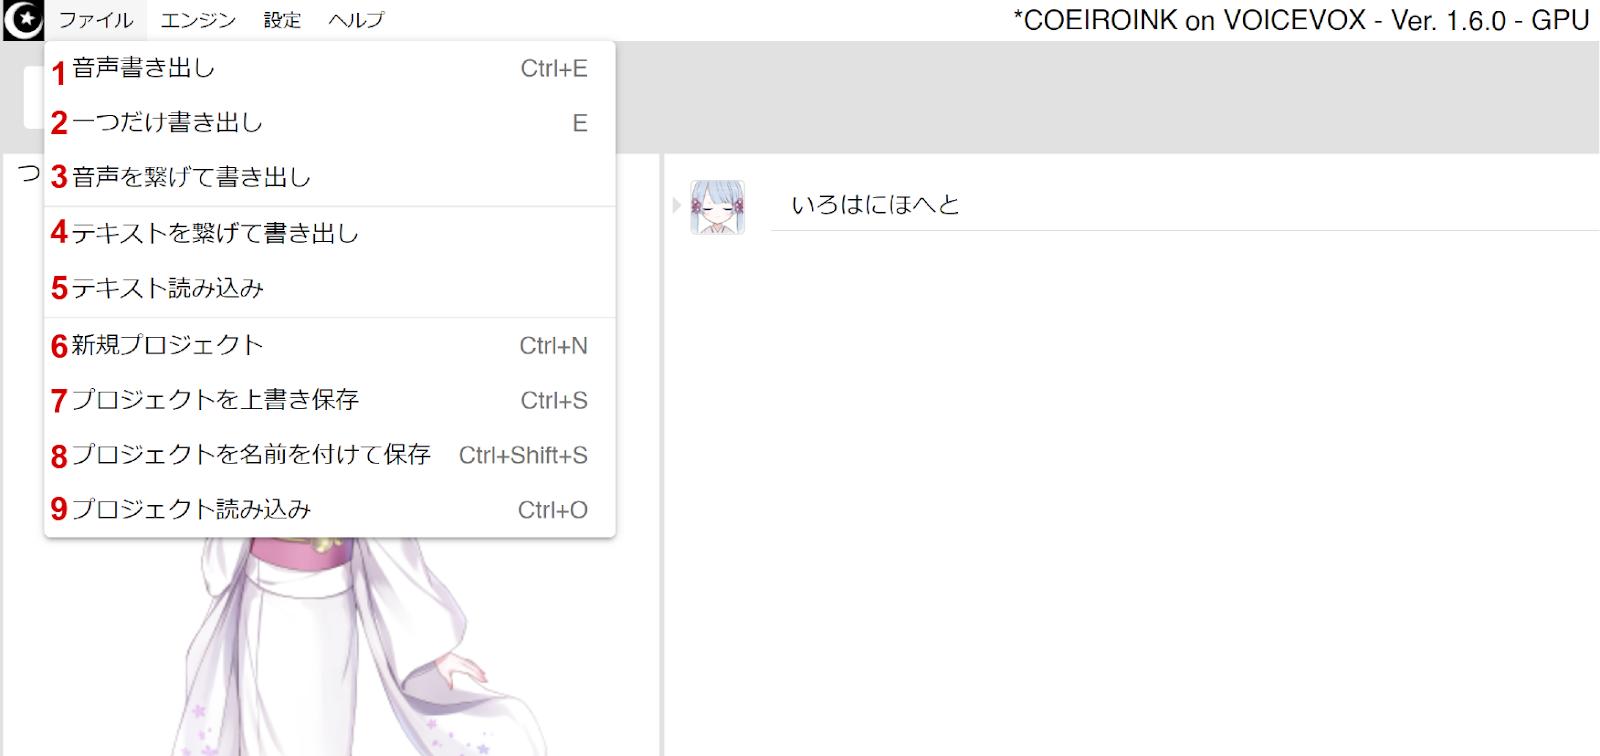
1. Export files exports each line in the project as a separate .wav file
2. Export single file -exports the currently selected line as a .wav file
3. Combine text lines and export as .wav
4. Combine text lines and export as .txt
5. Open text file - .txt files
6. New project
7. Save project
8. Save project as
9. Open project
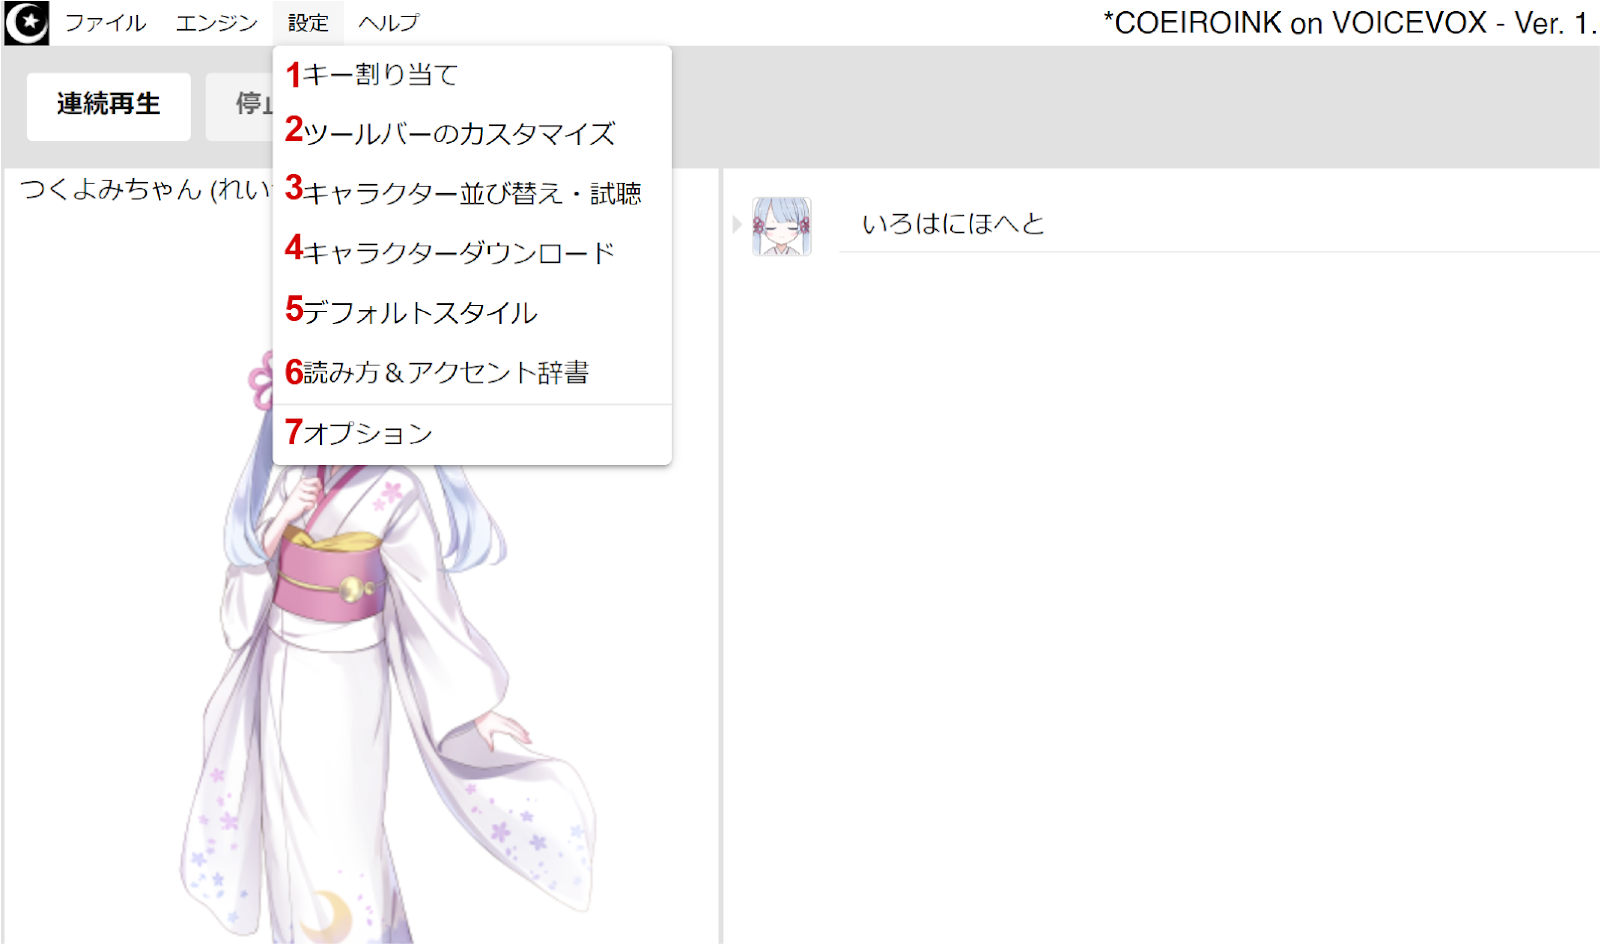
1. Shortcuts
2. Customize the toolbar
3. Reselect character
4. Character download -can download official COEIROINK models from here
5. Default style -unsure what this does
6. Pronunciation and accent dictionary -you can add words and then edit the program’s default pronunciation and accent for them
7. Options
Now that we know how to use the program, let's go into how to make a COEIROINK model of our own.
How exactly does this process work? I am not a coder and can’t say too much about the specifics. What I know is that by using Google Colab, you are able to take your own recordings and use Shirowani's code to train an AI model from it.
ITA Corpus (424 recordings) (Emotion(100)+Recitation(324)) [emotion] [recitation]
Mana Corpus (228 recordings) (Greetings+Connection phrases+Questions) [mana]
As they are all written in Japanese, you will either need to be able to read Japanese or be able to listen to samples and copy what they are saying exactly (ITA Corpus only). It is important that you read the lines exactly or else you risk having the code mislabel the sounds in the recording.
Training can begin with at least a minimum of 10 lines or a maximum of 652 lines (424+228)
ITA Corpus is a Japanese corpus made by Amitaro that they made to cover most phonemes. It is in the public domain, so many users have released their recordings of it online. These can be used as a guideline, especially if you find someone with a tone you’d like to emulate. They can often be found by searching for the term “ITAコーパス読み上げ”
A few examples of ITA Corpus being read:
[Amitaro youtube] [Yokune Ruko] [Ukyou Shiro] [Haruqa] [Hakuti](many styles)
Tsukuyomi-chan’s website also includes a list of released ITA Corpus recordings
These can be recorded using any program you prefer recording in. Personally, I find Oremo to be the best and quickest way as long as you use these files provided for recording in Oremo.
Be sure to set the folder you want to record to at the bottom of the window, and go to Options>Recording Style Settings, and set it to manual recording so it will only record if you are pressing the “R” key. As far as I know, MYCOEIROINK does not require very precise timings in your recordings, but it’s always good to have some silence before and after the part you record, in case you will be taking the files to a DAW to clear up background noises.
ITA Corpus
Oremo recording files provided by Haruqa [download page]
In Oremo, go to file>load voicelist and open the list you want to record in the “OREMO音名リスト” folder. To have the comment file for pronunciation assistance appear, go to the “OREMOコメント” folder and copy the “OREMO-comment.txt” file into the folder where you will be recording into.
Once you are done recording, create a copy of the folder containing your recording. Look inside the “ファイル名をいい感じにするやつ” folder and find the .bat file with “音名→ファイル名” that corresponds to the list you recorded. Copy it into the copied folder and double-click the .bat to run it. This will rename the files to the form MYCOEIROINK will be able to read.
Mana Corpus
Oremo recording files provided by Hakuti [download page]
In oremo, go to file>load voicelist and open the file “MANAコーパス_音名.txt”.
Once you are done recording, create a copy of the folder containing your recording. Copy the file “MANA_transcript_音名→ファイル名.bat” into the copied folder and double-click the .bat to run it. This will rename the files to the form MYCOEIROINK will be able to read.
IMPORTANT Make sure your wav files are: Mono, 44.1kHz, 16-bit, and named properly
IF ANY OF THE FILES ARE NOT FORMATTED LIKE THIS, THERE IS A HIGH CHANCE YOU WILL HAVE AN ERROR IN THE COLAB
Some miscellaneous tips I’ve seen from others and from myself:
This part is the easier part of making the model. As long as you follow the directions carefully, there should not be any errors.
I’m no expert, but here’s my limited knowledge about Google Colab. Through google, you can run code people have put into a google Colab notebook. The code will not be run on your own PC, but instead on an external server.
Make sure that you are using GPU by going to Runtime>Change runtime type. Your hardware accelerator should be set to ‘GPU’.
With that all set, let’s start going through the Google Colab
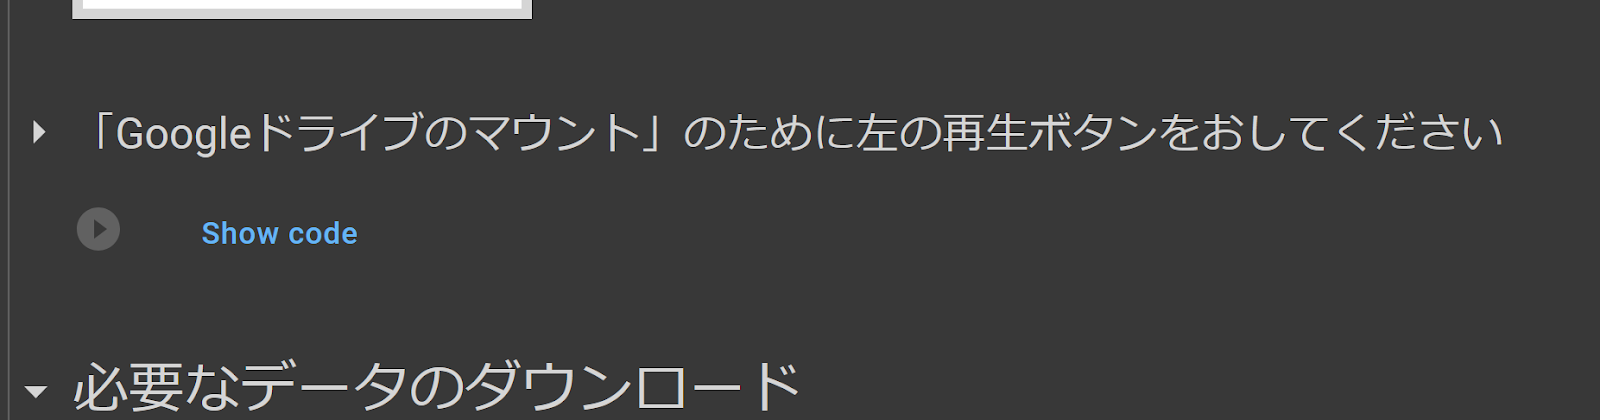
1. 「Googleドライブのマウント」
Mounting the Google Drive
To start off every session, you will need to mount your Google Drive. Scroll down until you see this text, and press the gray triangle button next to “show code” to run the code. You will have pop-ups asking if you give MYCOEIROINK permission to access your google drive. Accept all and wait for the code to complete, it will show a green checkmark next to it once it’s done.
2. 必要なデータのダウンロード
Required Data Download
Now scroll a little down to this part and run this code to download the necessary files to your Drive

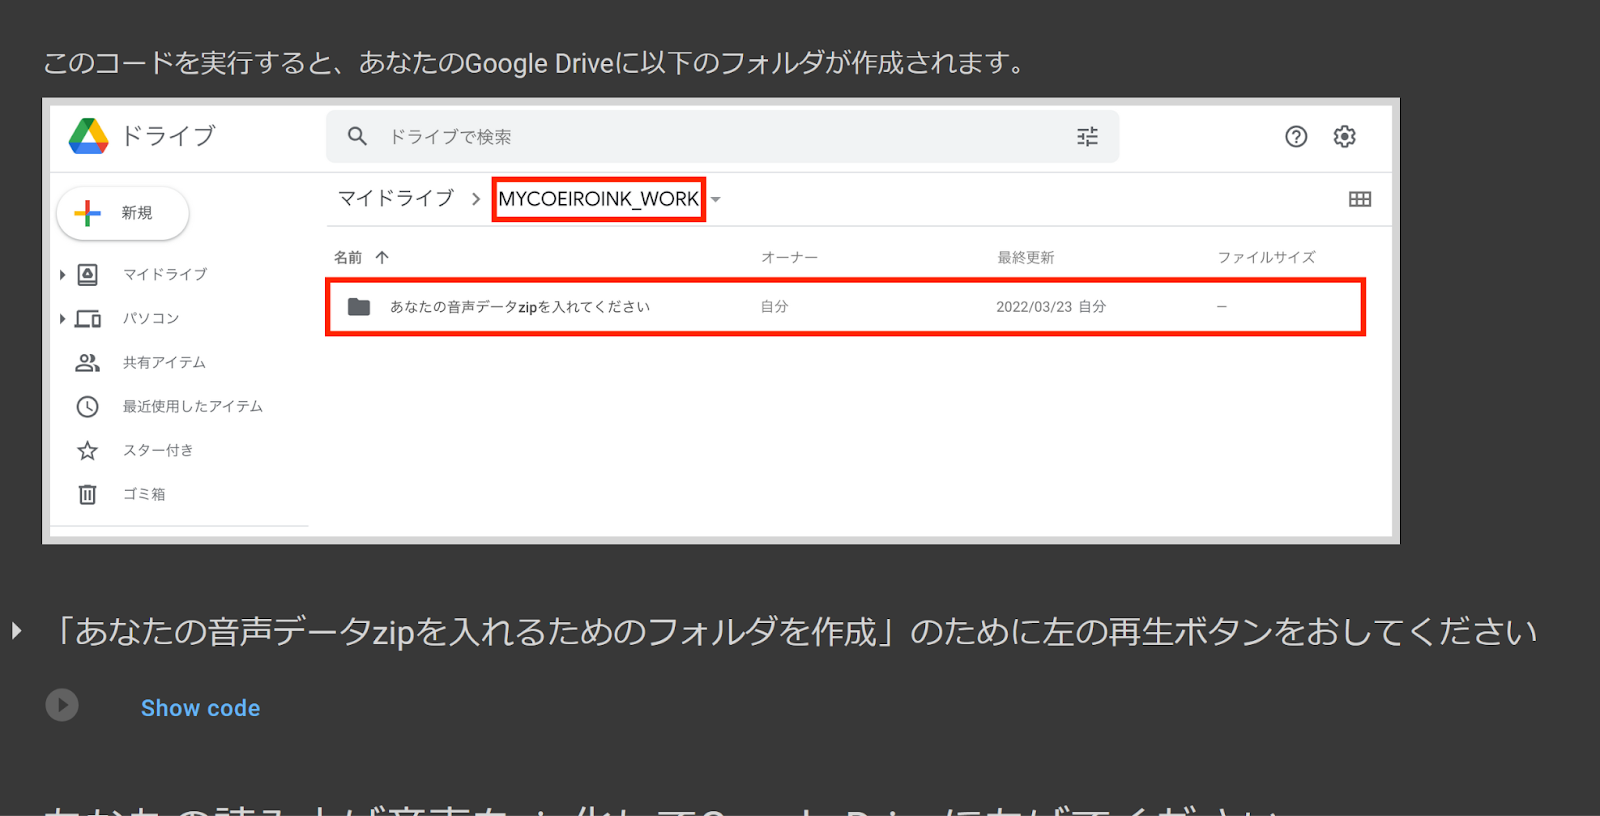
3. あなたの音声データzipを入れるためのフォルダを作成
Create Folder to Put Your zip in
Next, you will need to run this code to create the folder to place your recordings in. Once this code is complete, zip your recordings into one zip file without any additional folders in it, and upload it into this folder. You can name the zip anything you like.
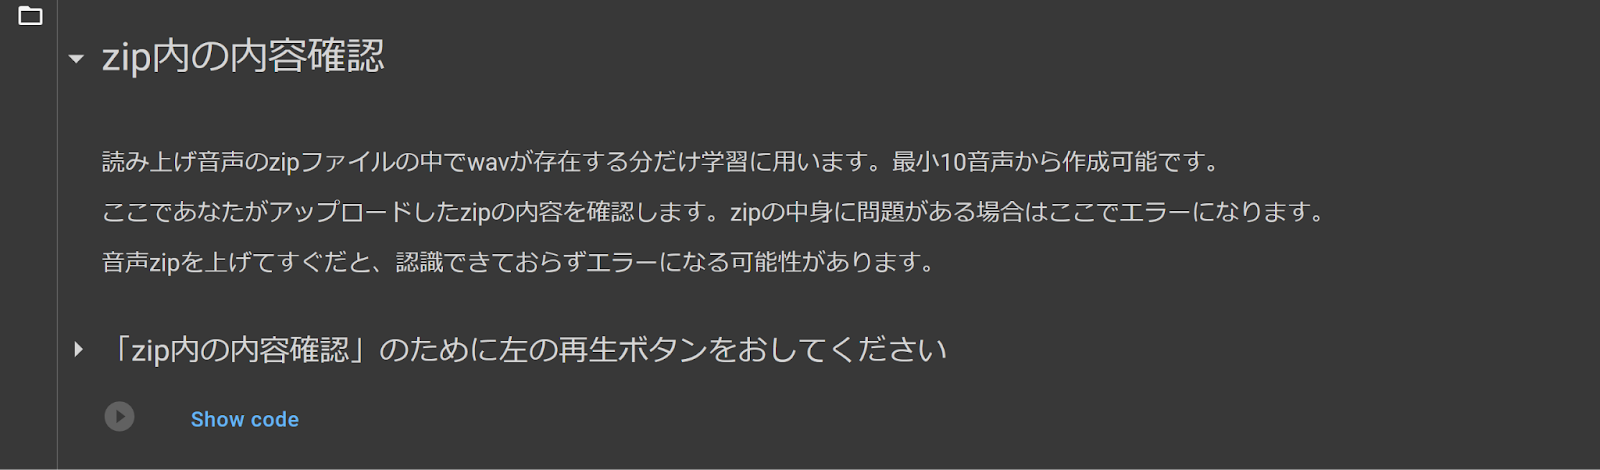
4. zip内の内容確認
zip FIle Content Confirmation
This code will analyze the .wav files inside your zip file. If any of your .wav’s are not formatted properly, you will receive an error from this code. Also, note that occasionally there will be errors if you have just uploaded your zip file.
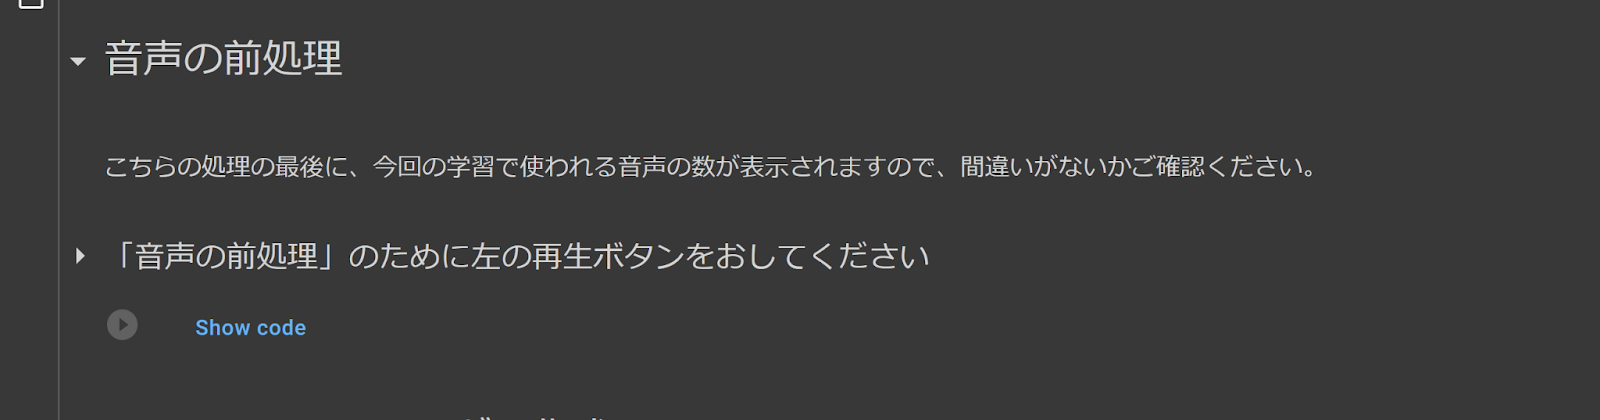
5. 音声の前処理
Audio Processing
This code will process the audio files and check the number of files that will be used for training. Make sure the number outputted by this code matches the number of .wav’s in your zip
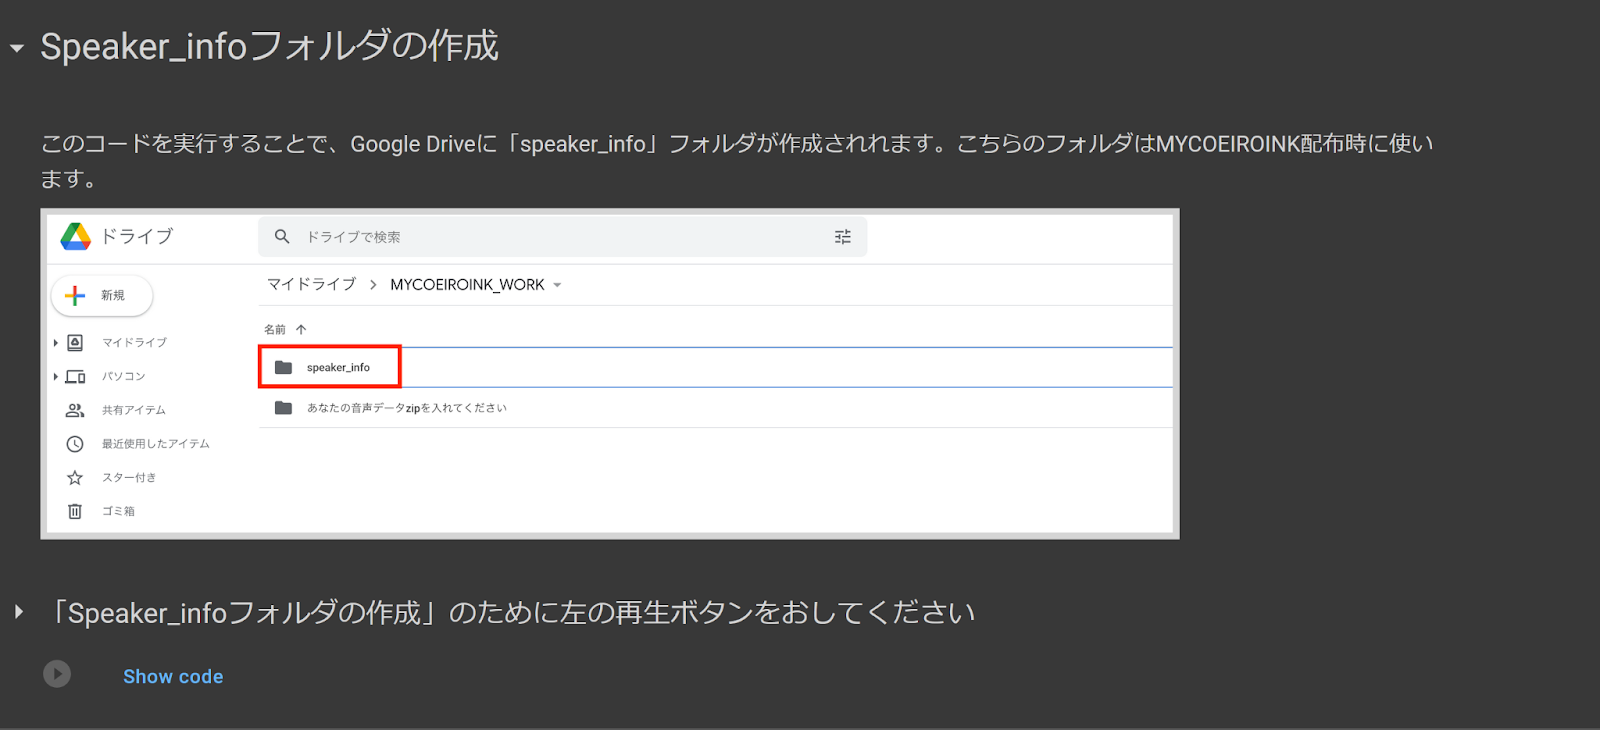
6. Speaker_infoフォルダの作成
Create Speaker_info Folder
This code creates a folder in your MYCOEIROINK folder which will be essential in assembling your model at the end.
7. モデルの作成のための環境構築1
Model Prep 1
This is the first code for preparing your files for training. This part may take about 7 minutes to complete. Near the end, it may show red text that looks like an error, but as long as the code shows a green checkmark, you are ok to go

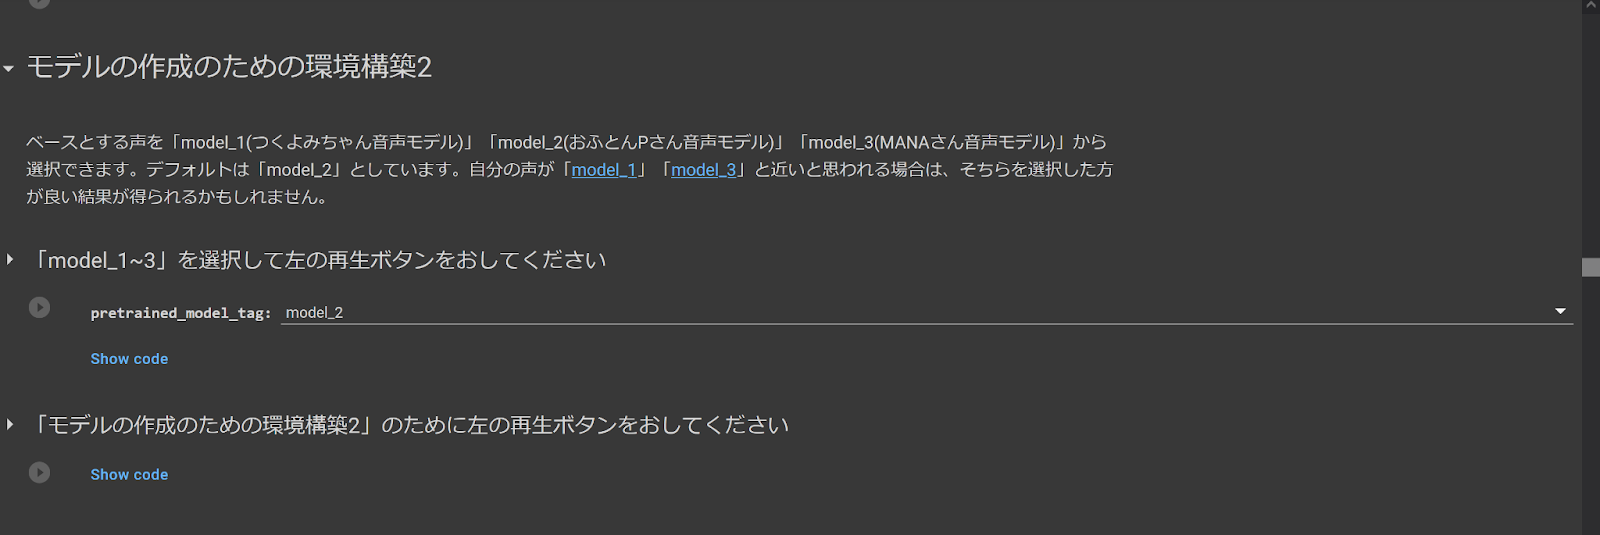
8. モデルの作成のための環境構築2
Model Prep 2
This is the 2nd code section for preparing for training. In the first code select a pre-trained model to base your model on. [model1] is Tsukuyomi-chan, [model2] is Ofuton-P, and [model3] is Mana. model2 is set as a default, but if you feel like your voice is closer to model1 or model3, selecting those options may produce better results.
After making your selection and running the first code, run the next code to complete this step
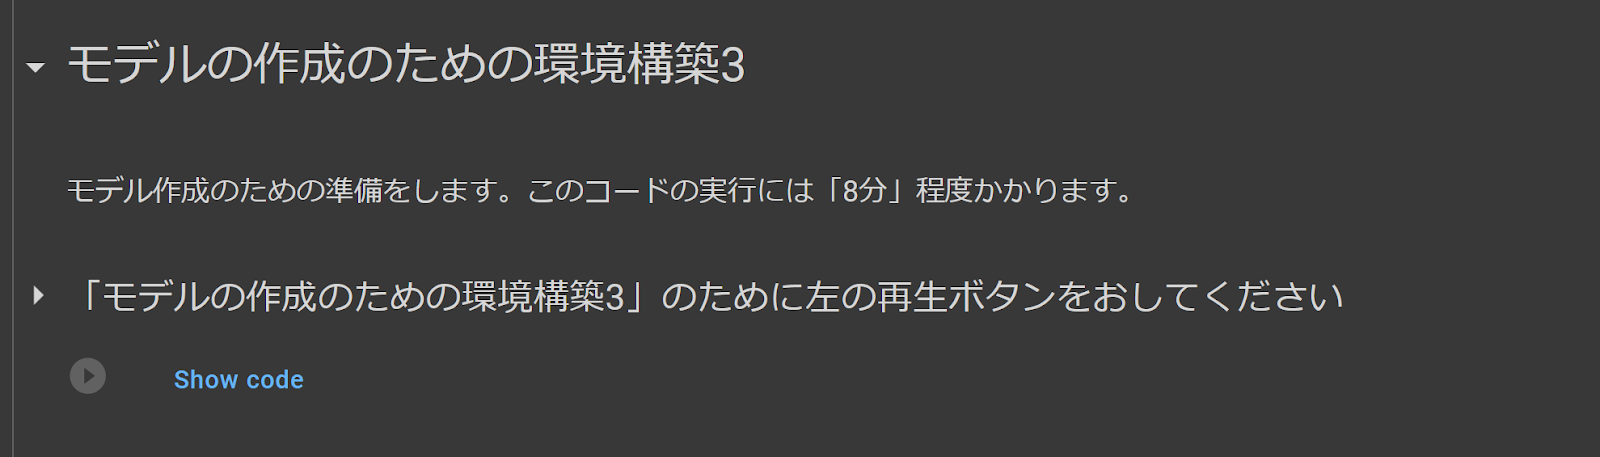
9. モデルの作成のための環境構築3
Model Prep 3
Final preparation code. This code may take about 8 minutes to complete
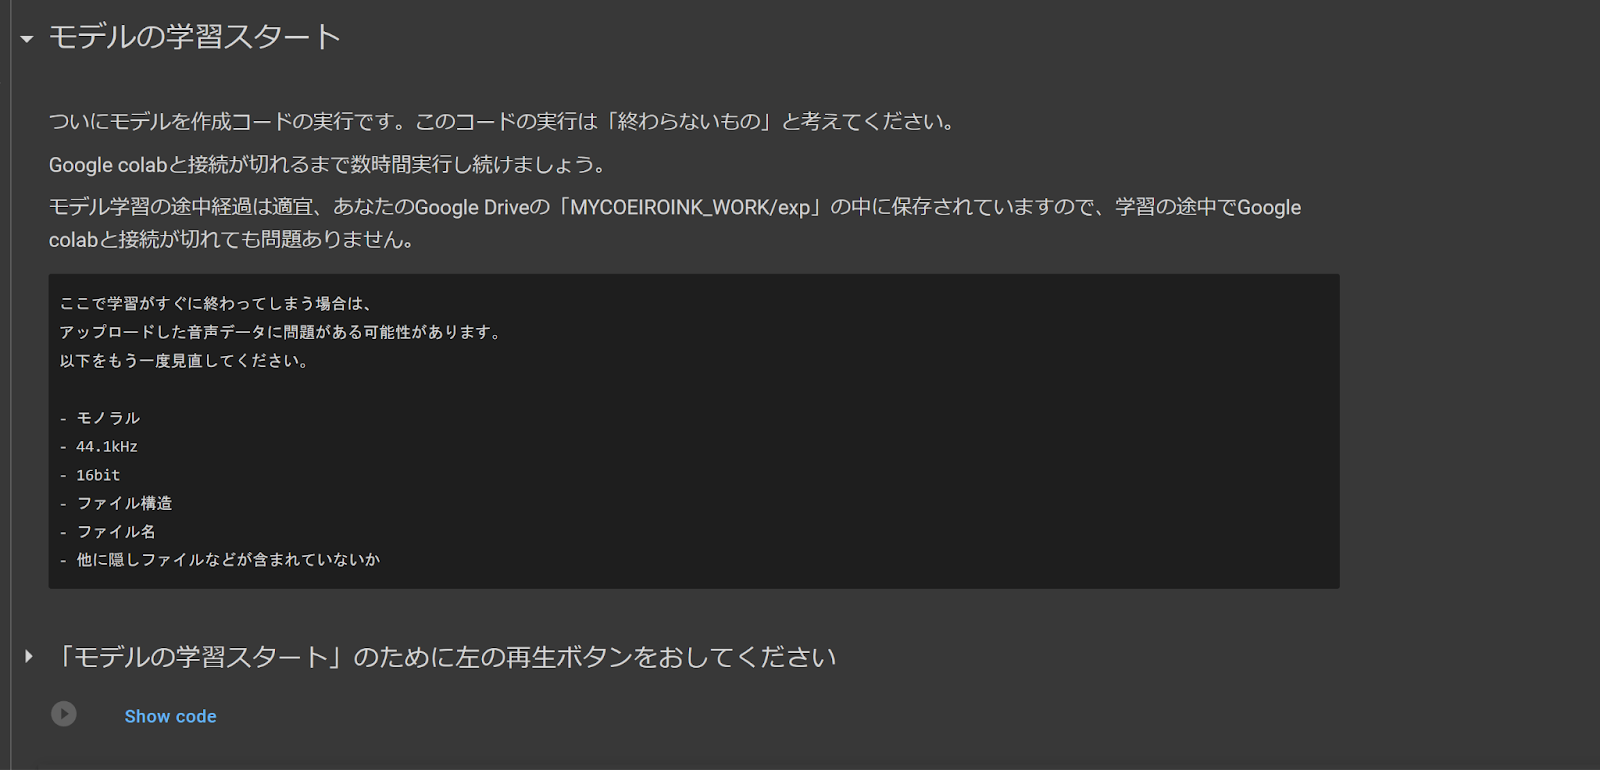
10. モデルの学習スタート
Model Training Start
Finally, we’re here at the training code! Once this code starts, it should go on indefinitely. As long as all the previous steps have been completed successfully this code should run smoothly. If the code stops unexpectedly and gives you an error, you may have missed a step or your uploaded files may have some errors.
This code can train a model up to 100 epochs. Shirowani recommends training to at least 30-50 epochs to have a stable model.
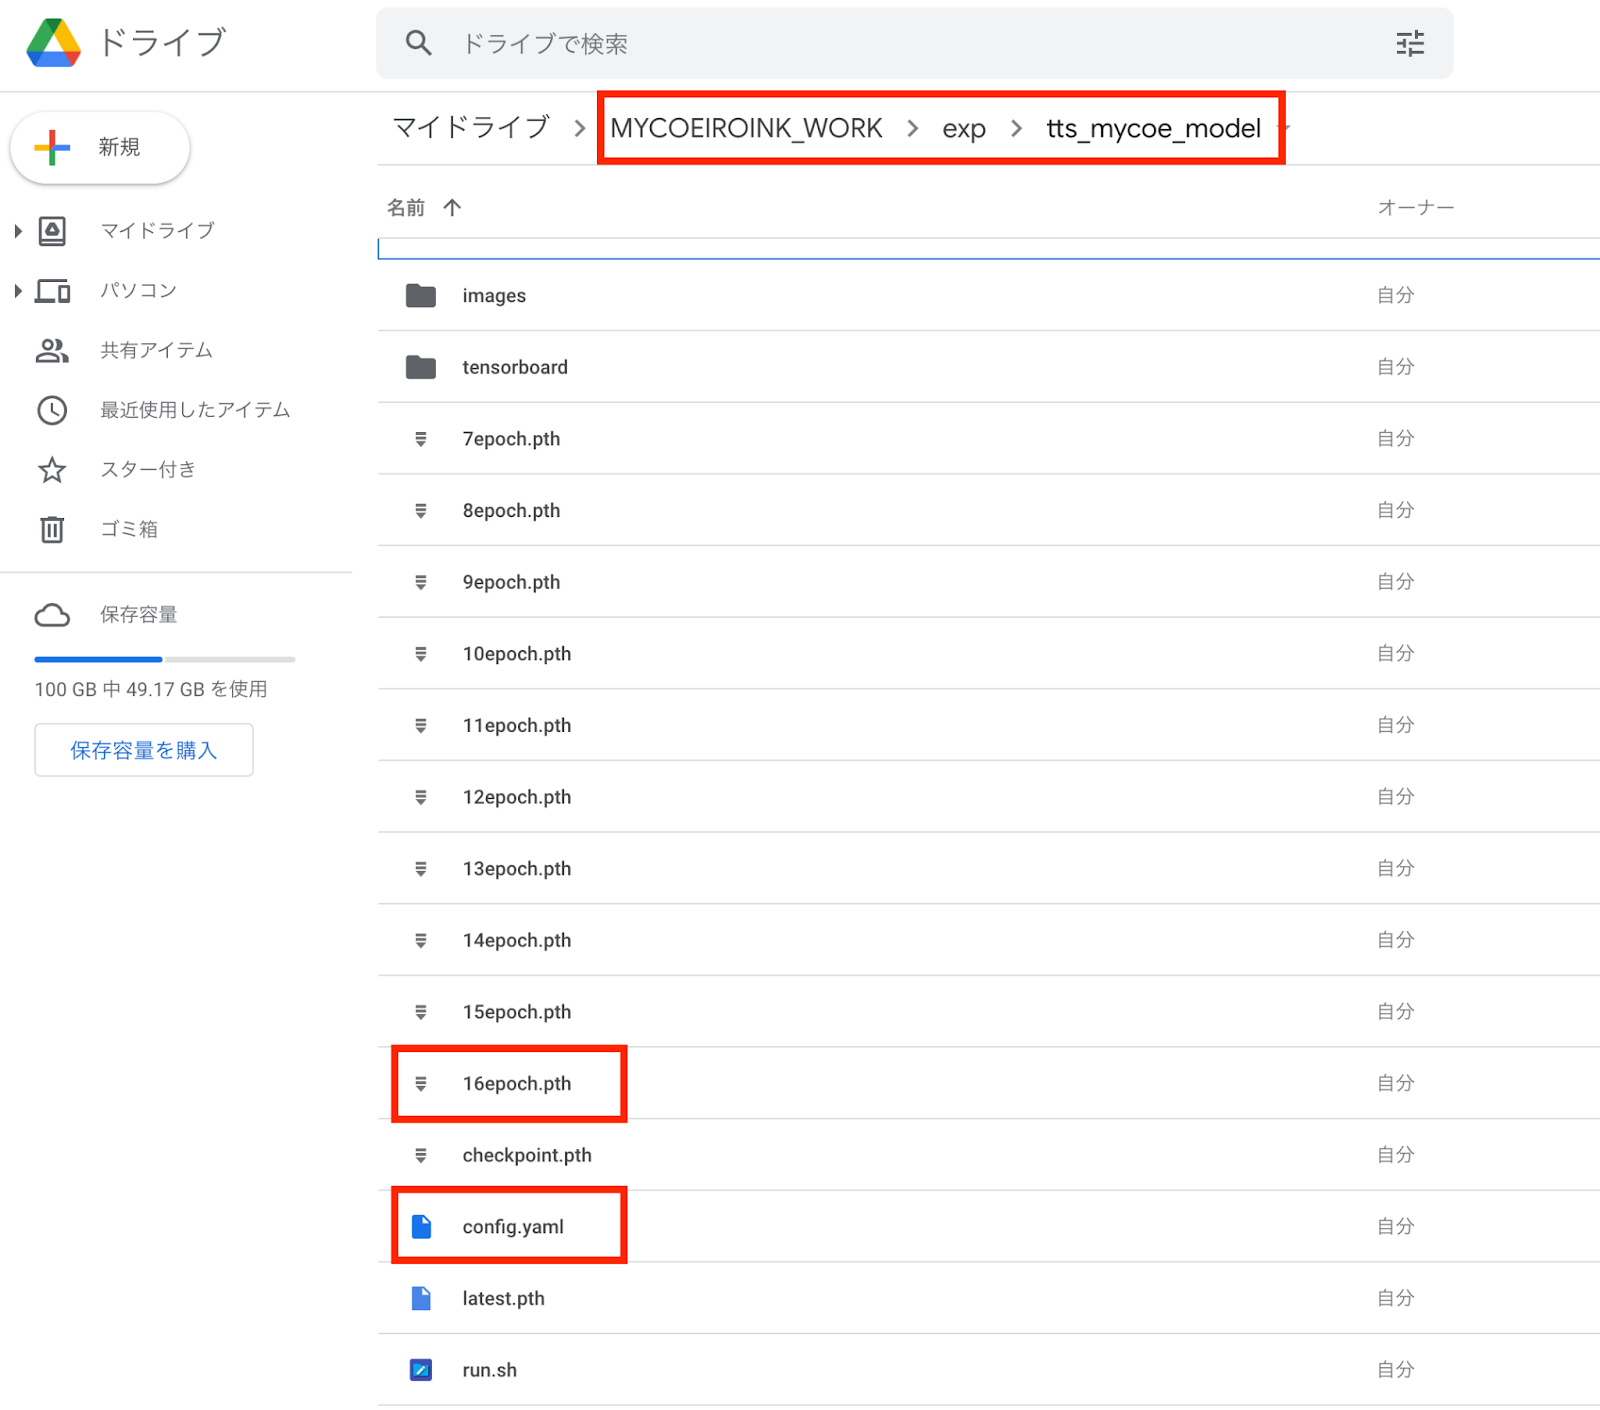
Next, find your most recent epoch file and the config.yaml and download them into your model’s model file, inside the folder with its ID
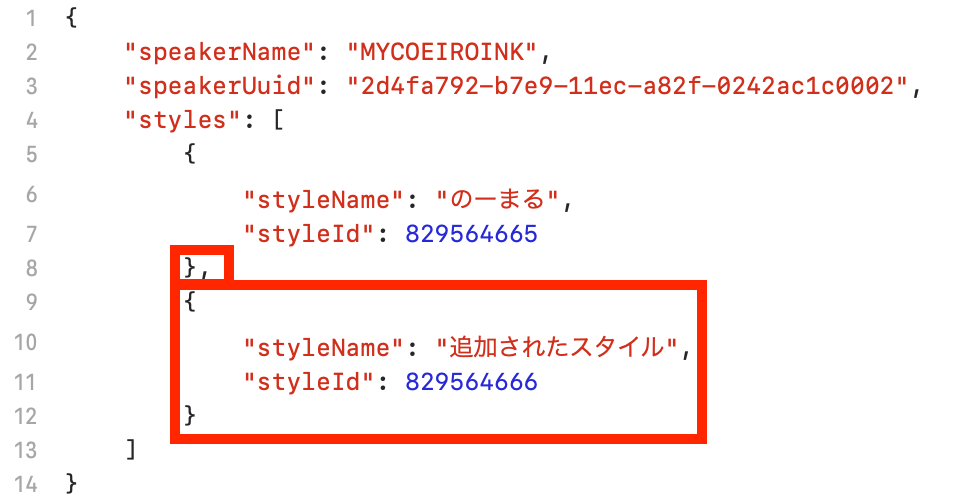
You can edit your model’s name and other data in metas.json. You can edit the speakerName and the styleName. Make sure to not alter the ID numbers as that may cause errors
To add a style, you must make copies of these files, and name them “the original file’s ID# +1” as seen below
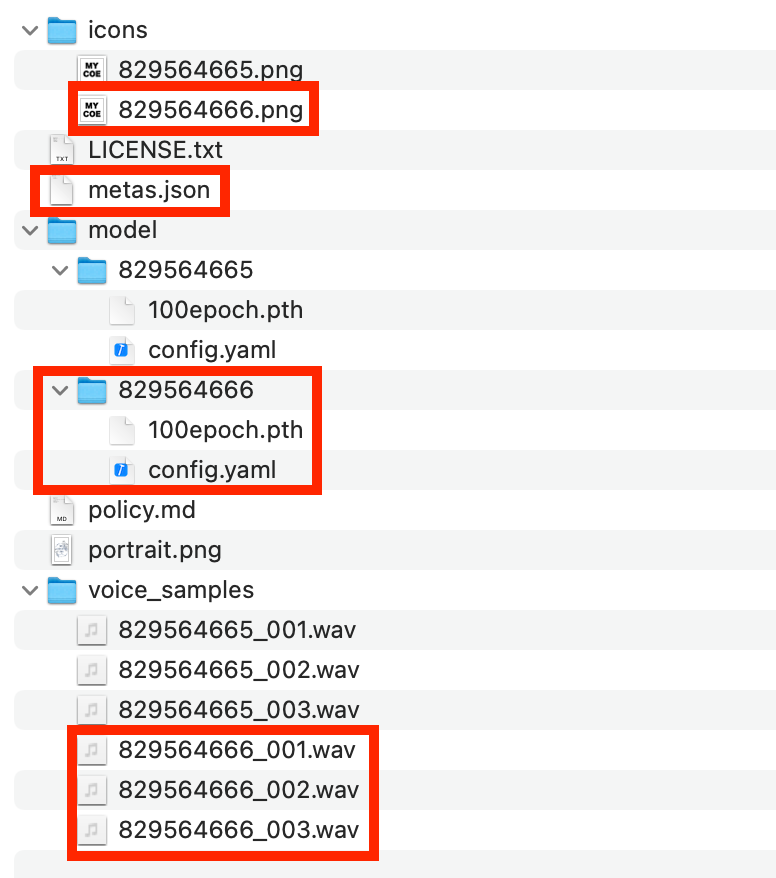
In the metas.json, make sure to add a comma (,) after the previous style, and make sure the styleId is “the original ID# +1”
As a simple hobbyist, I will not be going too much into specifics of things like the terms of service, codes, and such. These topics that are omitted are either things I am not that knowledgeable about or things that can be better understood by directly translating the official website. Additionally, this guide will be more directed at Windows users. I do not have a Mac, but some of this guide should still be followable for those who do.
COEIROINK
Official website: https://coeiroink.com/This first part will be about downloading and navigating the COEIROINK program itself.
DOWNLOAD
COEIROINK is currently supported on Windows and Mac. On the download page, you will see that for Windows, there is a version that uses GPU. If your computer is able to use GPU, it supposedly helps things load faster (personally have not tested it).NAVIGATION
Main Interface (Default)
1. File -view section below for options in this menu
2. Engine -shouldn’t need to touch this
3. Settings -view section below for options in this menu
4. Help
5. Play consecutive lines -will render and playback consecutive lines from the currently selected line
6. Stop -stops playback
7. Export 1 line -exports currently selected line as a .wav file
8. Character standing art and info -the model’s name and version should appear here
9. Input -this is where you can write lines for the model to say. Press the plus button in the corner to add additional lines
10. Play -plays the currently selected line
11. Accent -shows and allows editing of which sounds are grouped together and which sound is accented
12. Speaking speed -adjust how fast the line is spoken
13. Pitch -adjust the pitch of the voice for the line
14. Intonation -changes the tone. When it’s lower it sounds colder/more stern and when it’s higher it sounds brighter/warmer
15. Volume
16. Pause before line -adjust how long the voice pauses before the line
17. Pause after line -adjust how long the voice pauses after the line
File
1. Export files exports each line in the project as a separate .wav file
2. Export single file -exports the currently selected line as a .wav file
3. Combine text lines and export as .wav
4. Combine text lines and export as .txt
5. Open text file - .txt files
6. New project
7. Save project
8. Save project as
9. Open project
Settings
1. Shortcuts
2. Customize the toolbar
3. Reselect character
4. Character download -can download official COEIROINK models from here
5. Default style -unsure what this does
6. Pronunciation and accent dictionary -you can add words and then edit the program’s default pronunciation and accent for them
7. Options
TERMS OF SERVICE
The most basics of their terms of service:- Always include credit to “COEIROINK” when using this program
- Always include the name of the voice model used
MYCOEIROINK
Official website: https://coeiroink.com/mycoeiroinkNow that we know how to use the program, let's go into how to make a COEIROINK model of our own.
How exactly does this process work? I am not a coder and can’t say too much about the specifics. What I know is that by using Google Colab, you are able to take your own recordings and use Shirowani's code to train an AI model from it.
RECORDING
This is the most labor-intensive part of the process. MYCOEIROINK currently can only train using recordings from these corpora (sentence collections):ITA Corpus (424 recordings) (Emotion(100)+Recitation(324)) [emotion] [recitation]
Mana Corpus (228 recordings) (Greetings+Connection phrases+Questions) [mana]
As they are all written in Japanese, you will either need to be able to read Japanese or be able to listen to samples and copy what they are saying exactly (ITA Corpus only). It is important that you read the lines exactly or else you risk having the code mislabel the sounds in the recording.
Training can begin with at least a minimum of 10 lines or a maximum of 652 lines (424+228)
Samples
For both corpora, it is possible to use an existing TTS service such as Google or other COEIROINK models as references for how to pronounce your recordings.ITA Corpus is a Japanese corpus made by Amitaro that they made to cover most phonemes. It is in the public domain, so many users have released their recordings of it online. These can be used as a guideline, especially if you find someone with a tone you’d like to emulate. They can often be found by searching for the term “ITAコーパス読み上げ”
A few examples of ITA Corpus being read:
[Amitaro youtube] [Yokune Ruko] [Ukyou Shiro] [Haruqa] [Hakuti](many styles)
Tsukuyomi-chan’s website also includes a list of released ITA Corpus recordings
Oremo
Oremo download: https://osdn.net/downloads/users/3/3800/oremo-english-3.0-b140323.zip/These can be recorded using any program you prefer recording in. Personally, I find Oremo to be the best and quickest way as long as you use these files provided for recording in Oremo.
Be sure to set the folder you want to record to at the bottom of the window, and go to Options>Recording Style Settings, and set it to manual recording so it will only record if you are pressing the “R” key. As far as I know, MYCOEIROINK does not require very precise timings in your recordings, but it’s always good to have some silence before and after the part you record, in case you will be taking the files to a DAW to clear up background noises.
ITA Corpus
Oremo recording files provided by Haruqa [download page]
In Oremo, go to file>load voicelist and open the list you want to record in the “OREMO音名リスト” folder. To have the comment file for pronunciation assistance appear, go to the “OREMOコメント” folder and copy the “OREMO-comment.txt” file into the folder where you will be recording into.
Once you are done recording, create a copy of the folder containing your recording. Look inside the “ファイル名をいい感じにするやつ” folder and find the .bat file with “音名→ファイル名” that corresponds to the list you recorded. Copy it into the copied folder and double-click the .bat to run it. This will rename the files to the form MYCOEIROINK will be able to read.
Mana Corpus
Oremo recording files provided by Hakuti [download page]
In oremo, go to file>load voicelist and open the file “MANAコーパス_音名.txt”.
Once you are done recording, create a copy of the folder containing your recording. Copy the file “MANA_transcript_音名→ファイル名.bat” into the copied folder and double-click the .bat to run it. This will rename the files to the form MYCOEIROINK will be able to read.
IMPORTANT Make sure your wav files are: Mono, 44.1kHz, 16-bit, and named properly
IF ANY OF THE FILES ARE NOT FORMATTED LIKE THIS, THERE IS A HIGH CHANCE YOU WILL HAVE AN ERROR IN THE COLAB
Tips
Some tips from Shirowani for recording:- Pause only at 「。」and「、」, otherwise read the lines continuously. Pausing in other places may produce a model that pauses weirdly in places where you didn’t intend
- For MYCOEIROINK, 「・」is not considered a pause. Please read 「・」like it doesn’t exist
- If you read these lines dynamically like in anime, there is a possibility that the model will have an unstable and fluctuating tone. It’s best to stick to 1 tone/emotion to produce a more stable model. Reading like you’re reading a script will create a stable model, but may sound stiff. By being aware of and sticking to “speaking naturally”, you are more likely to produce a stable model that better reflects how your character speaks.
- Be careful with stretching the last vowel of phrases when it is not written in that way. Recording 「そうですか?」as「そうですかぁ?」or「そうですかー?」may create unintended extended sounds. Keeping these ends short and clean can help create a more stable model
- Note that these are just tips that Shirowani noted from trends in MYCOEIROINK, and do not need to be strictly followed since it may not necessarily be good for all models
Some miscellaneous tips I’ve seen from others and from myself:
- Be careful with background noises. Either create a well-sound-treated space or be sure to clean up background sounds in a DAW in order to create a clearer sounding model
- Some of these sentences can be tricky to read. Sometimes it’s good to practice reading a line by breaking it into chunks and then figuring out how to record the whole line from there. If all else fails, skip the line and move on.
TRAINING THE MODEL
Google Colab: https://colab.research.google.com/d...FVGCYwvaJ4R?usp=sharing#scrollTo=23cUYv0BwN-eThis part is the easier part of making the model. As long as you follow the directions carefully, there should not be any errors.
I’m no expert, but here’s my limited knowledge about Google Colab. Through google, you can run code people have put into a google Colab notebook. The code will not be run on your own PC, but instead on an external server.
Make sure that you are using GPU by going to Runtime>Change runtime type. Your hardware accelerator should be set to ‘GPU’.
File Setup
First, make sure you have at least 7 GB free on your Google Drive. MYCOEIROINK will need a lot of space to download necessary files for training and will create many huge files for each iteration of training.With that all set, let’s start going through the Google Colab
1. 「Googleドライブのマウント」
Mounting the Google Drive
To start off every session, you will need to mount your Google Drive. Scroll down until you see this text, and press the gray triangle button next to “show code” to run the code. You will have pop-ups asking if you give MYCOEIROINK permission to access your google drive. Accept all and wait for the code to complete, it will show a green checkmark next to it once it’s done.
2. 必要なデータのダウンロード
Required Data Download
Now scroll a little down to this part and run this code to download the necessary files to your Drive
3. あなたの音声データzipを入れるためのフォルダを作成
Create Folder to Put Your zip in
Next, you will need to run this code to create the folder to place your recordings in. Once this code is complete, zip your recordings into one zip file without any additional folders in it, and upload it into this folder. You can name the zip anything you like.
4. zip内の内容確認
zip FIle Content Confirmation
This code will analyze the .wav files inside your zip file. If any of your .wav’s are not formatted properly, you will receive an error from this code. Also, note that occasionally there will be errors if you have just uploaded your zip file.
5. 音声の前処理
Audio Processing
This code will process the audio files and check the number of files that will be used for training. Make sure the number outputted by this code matches the number of .wav’s in your zip
6. Speaker_infoフォルダの作成
Create Speaker_info Folder
This code creates a folder in your MYCOEIROINK folder which will be essential in assembling your model at the end.
Training
7. モデルの作成のための環境構築1
Model Prep 1
This is the first code for preparing your files for training. This part may take about 7 minutes to complete. Near the end, it may show red text that looks like an error, but as long as the code shows a green checkmark, you are ok to go
8. モデルの作成のための環境構築2
Model Prep 2
This is the 2nd code section for preparing for training. In the first code select a pre-trained model to base your model on. [model1] is Tsukuyomi-chan, [model2] is Ofuton-P, and [model3] is Mana. model2 is set as a default, but if you feel like your voice is closer to model1 or model3, selecting those options may produce better results.
After making your selection and running the first code, run the next code to complete this step
9. モデルの作成のための環境構築3
Model Prep 3
Final preparation code. This code may take about 8 minutes to complete
10. モデルの学習スタート
Model Training Start
Finally, we’re here at the training code! Once this code starts, it should go on indefinitely. As long as all the previous steps have been completed successfully this code should run smoothly. If the code stops unexpectedly and gives you an error, you may have missed a step or your uploaded files may have some errors.
This code can train a model up to 100 epochs. Shirowani recommends training to at least 30-50 epochs to have a stable model.
Continuing Training
When Google Colab inevitably limits your use of the runtime (unless you have paid for compute units), it is easy to restart the training process from where you left off. Simply wait a couple of hours (typically around 6-12 hours) and then you must go through steps 1, 4, 5, 7-10 again in order to run the training code from where it last left off.
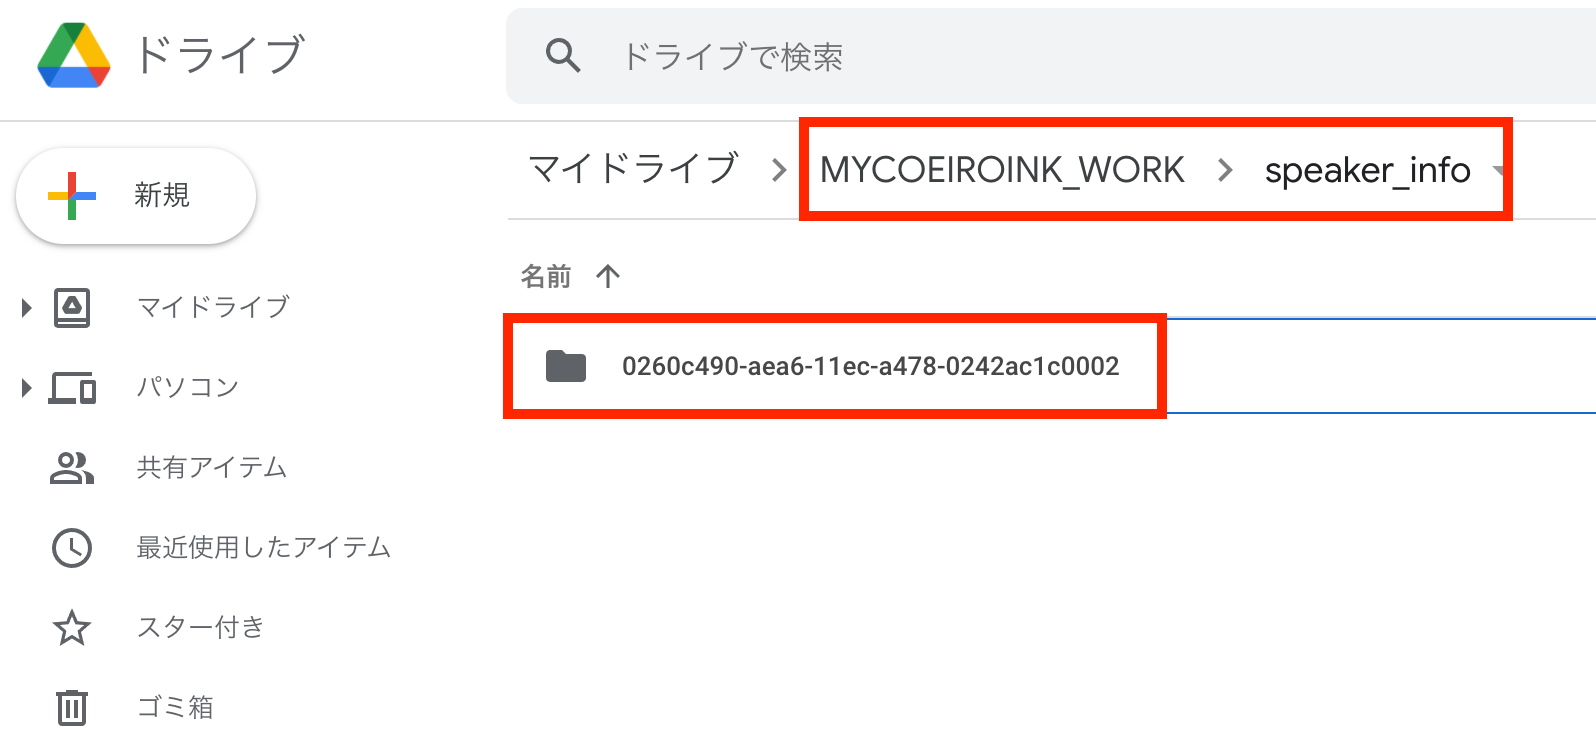
ADDING THE MODEL TO COEIROINK
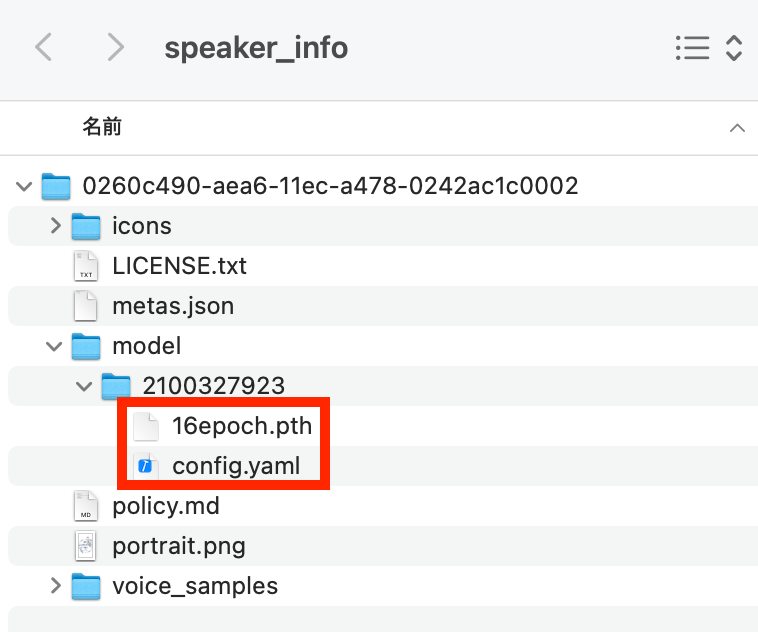
First download the folder with many numbers on it from the speaker_info folder. Place this folder inside the speaker_info folder in your COEIROINK program files
Next, find your most recent epoch file and the config.yaml and download them into your model’s model file, inside the folder with its ID
Customization
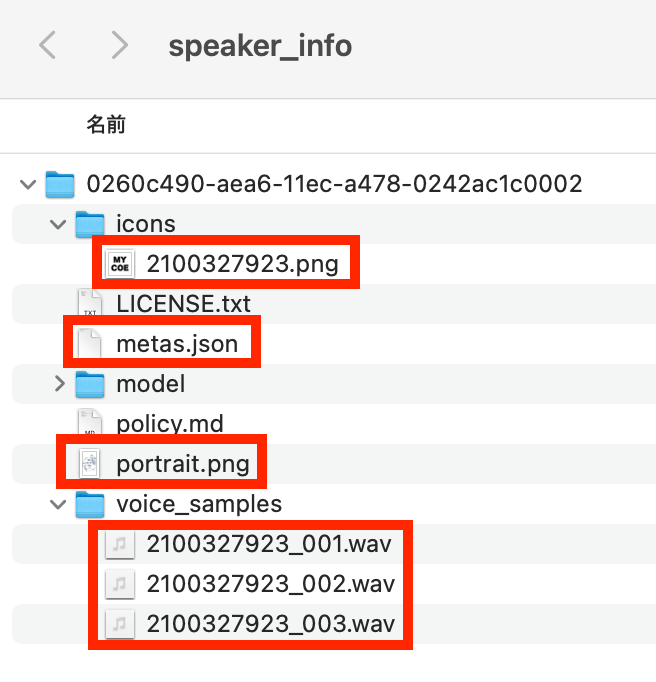
You can customize the portrait, icon image, and sample lines by replacing the corresponding files in the model’s folder. The default portrait is 300x500 pixels and the default icon is 256x256 pixels
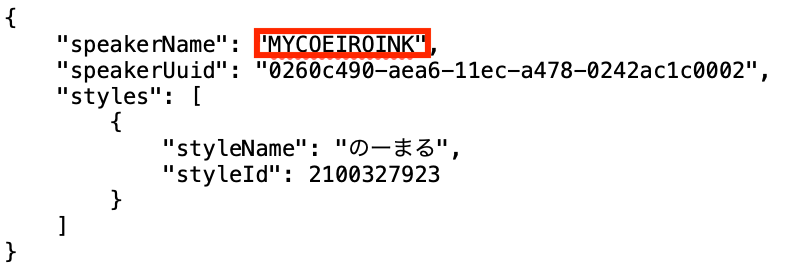
You can edit your model’s name and other data in metas.json. You can edit the speakerName and the styleName. Make sure to not alter the ID numbers as that may cause errors
Adding Styles
(Have not personally tested)To add a style, you must make copies of these files, and name them “the original file’s ID# +1” as seen below
In the metas.json, make sure to add a comma (,) after the previous style, and make sure the styleId is “the original ID# +1”

