
A comprehensive guide on writing base configuration files (otos) for Classic UTAU and OpenUTAU. Also applicable to DIY synths that use the same configuration parameters. This resource assumes at least a basic knowledge of UTAU.
This tutorial is crossposted from my website. Part 2 covers making bases from finished voicebanks and Part 3 covers making bases using regular expressions.
What is a Base OTO?
A base oto is a template for an UTAU voicebank configuration file, or oto.ini. Essentially, they do the work of splitting up a string into samples ahead of time so that this does not have to be done manually during the configuration process. They also often, but not always, provide numerical values for parameters with fixed values and rough estimates for those which will be adjusted later.
They are not meant to serve as a replacement for manual oto'ing; most samples will still need to be adjusted (human speech is imperfect, after all). Rather, they exist to make the process faster and easier.
There are a lot of benefits to creating a base oto, and they are not terribly difficult to set up. Having the samples already split into their own lines and named takes care of one of the more tedious parts of oto'ing, and if a certain parameter's value is going to be the same for every string, it can save a lot of time to have it already in place. This is especially true if you plan to use the same reclist for multiple voicebanks, multiple pitches in the same voicebank, or to release a reclist publicly for other people's usage.
Things to Keep in Mind
First thing's first, you'll need to understand the reclist you're working with. Especially if it's one you've written yourself, you should already have in mind what samples are going to be pulled from each string and how they're going to be aliased.
You should also be familiar with the structure of the oto. Ideally, you should have a general idea of which values will go in the parameters of each sample type, but these can always be adjusted later after testing the base. If you need a refresher, each line of the oto follows this format:
I've colour-coded the parameters to make it a little more obvious what each value is refering to in the visual editor.
Lastly, you'll want to know what tempo the reclist is meant to be recorded at, as this will affect the parameter values, notably the offset and cutoff.
With all of this in mind, you're ready to start building your base.
Making Base OTOs from Scratch
You will need:
Copy, Paste, Find, Replace
For most reclists, you are going to have a lot of strings which are identical in structure and differ only by what phones are included. As such, it's often more efficient to build the base of one string of each type which can then be duplicated and edited rather than having to manually create every line of the reclist.
Which strings this can be done with will of course depend on the reclist, but it can save a lot of time. The caveat is that if there is a mistake in the initial string, like a typo in the alias, this will also get copied to every other string, so be sure to proofread your work carefully.
For example, let's say we're making a base for a 2-mora CVVC and the majority of our strings look like CV-CVC. Rather than manually writing each line of the reclist, we can build the base for the first string, then copy it for the others. So, we alias the first line like so:
Then, we copy+paste it right underneath:
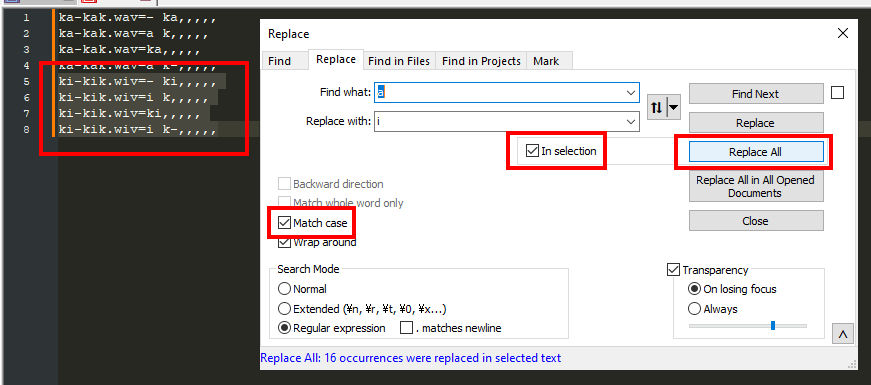
Now, we can highlight the duplicated string, open up the find and replace menu using <CTRL+H>, and replace [a] with [ i]. Make sure that In selection is enabled so that other instances of [a] won't be effected, as well as Match case because UTAU is case-sensitive. Hit Replace All.
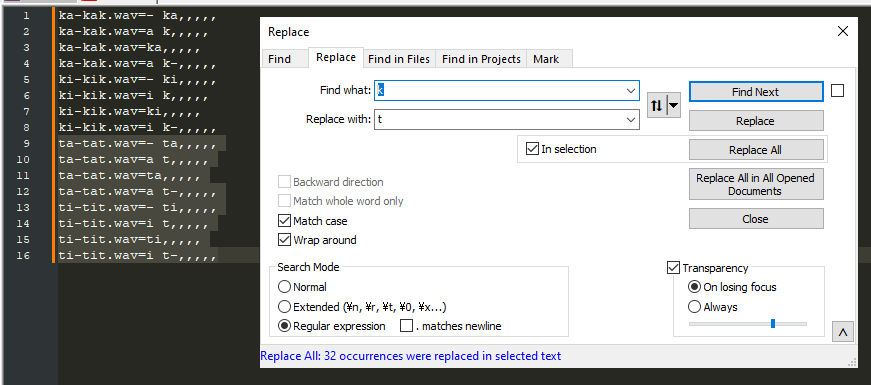
Uh-oh, looks like we accidentally changed the [.wav] part of the oto for the new lines. There's an easy way to fix this, however; we repeat the find and replace process on the section by finding [wiv] and replacing it with [wav].
Alternatively, this problem can be avoided altogether by creating a placeholder string which uses characters that won't be found elsewhere in the reclist and using this for creating new strings, for example:
But this isn't strictly necessary. Which placeholders are used is obviously going to depend on the specific reclist and string type as well.
When we have all of our vowels taken care of, we can duplicate the entire section and repeat the find and replace process with the next consonant.
This can also be done the other way around for reclists which are organized by vowel first and consonant second, but general idea remains the same; no reason to create extra work for yourself.
Of course, this becomes trickier when dealing with triphones like VCVs, consonant clusters, and generally non-Latin characters, and this whole process is reliant on strings being uniform, but having this in your toolbelt is quite useful when applicable.
Ideally this will also be done with all of the parameters of each line set to avoid even more tedious work, but I wanted to show how to do it before diving into the parameters themselves.
Alias
Before setting any of the parameter values, it's a good idea to set the sample aliases of the string you're working with. This will help you see what types of samples are being pulled from the string and how many there are of each type.
For an unstringed CV reclist, the alias is going to be the same as the file name (or its kana equivalent). Even if they are exactly the same, it's good practice to set the alias anyways, especially if you plan to put the audio files into a subfolder, just to ensure they'll be pulled correctly by the resampler.
For any other type of reclist, you'll want to duplicate the string for as many samples as will be pulled from it. This can be done by copypasting or by hitting <CTRL+D> in Notepad++.
For example, if we have a Japanese VCV string like [ka-ka-ki-ka-ku-ka-N-ka], we would duplicate it 6 times for 7 lines total, one for the initial CV and six for each VCV. Assuming that [ん] is taken care of elsewhere in the reclist, we do not need to create a line for [a ん] here.
Next, fill in each of the aliases. Remember that these go between the equals sign and the first comma, and any whitespace will be read as part of the alias. So, our VCV string ends up looking like this:
For an English CVVC string like [A-pA-bA-tA-dA-kA-gA], we get something like this, with 6 VCs and 6 CVs making for a total of 12 lines per string:
It's a good idea to generally keep your aliases in sequential order, as this will help you keep track of where you are in the audio file and make it more obvious if your offsets are out of whack, but as we see with the CVVC strings, we don't have to be strict about it. In that case, I prefer to group like-samples together to make for easier oto'ing, so that way you won't have to be constantly alternating between VCs and CVs. This is a matter of personal preference for organization, however; the order of the lines in the oto doesn't actually matter.
For some base otos, the process stops here, but most of the time, you'll want to fill in some of the numerical values as well.
Timing
As mentioned, in order to figure out our approximate parameter values, we need to know how the samples are going to be timed in the recordings. Most importantly, we need need to know the tempo (BPM) the strings will be recorded at, as this will tell us the duration of every beat and by extension how long every syllable will be held.
The oto is measured in milliseconds (ms), and thus voicebanks are usually recorded at tempos where every beat's duration is nice number to work with. Here's a handy chart:
A longer vowel gives the config and by extension the resampler more to work with, but holding a note too long can be more difficult for the vocalist or start to create irregularities. A good note length is usually somewhere between 400 and 2400 ms. As such, voicebanks are usually recorded with each syllable held from 1 to 4 beats at somewhere between 100 and 150 BPM.
Using this, we can figure out how far apart each of our samples will be in the oto; for instance, if we're recording at 120 BPM and holding each syllable for 1 beat, then each syllable in the string is going to be 500 ms apart. This is what we'll use to determine our parameter values.
Preutterance and Overlap
It may seem counter-intuitive to start with these as they are are at the end of the oto line, but these values are often the easiest to predict, and are additionally used for determining what other parameters should be set to.
For samples like VCVs, VCs, and VVs as well as in some cases initial CVs, these are going to have fixed values, meaning that they won't be changed during configuration. How long the preutterance is will be somewhat dependent on how much of the previous vowel we have to work with and how long we want the transition to last from note to note. The overlap will usually be 1/4th or 1/3rd the length of the preutterance, and should not be more than half of it.
For a longer transition with more overlap (typical for VCVs), I use 300 for the preutterance and 100 for overlap, and for a shorter transition with less overlap (typical for VCs), I use 200 for the preutterance and 50 for the overlap.
For typical CVs, I find that a preutterance of 100 and an overlap of 25 is a good starting point, as a typical consonant is going to fall somewhere around that length, but these can be refined later if they're too long or short for a particular phone. For medial CCs, I use a preutterance of 75 and an overlap of 25 since slightly less of the consonant is included.
So, our examples from before now look like this:
Cutoff
Next, let's determine the cutoff. A cutoff with a value of 0 would tell UTAU to stop the sample at the very end of the .wav file, which is almost never what we want. A cutoff with a positive value counts backwards from the end of the file to the beginning. We could, theoretically, calculate exactly where each of our cutoffs should be relative to that, but especially if you're not recording with a guideBGM, that can be tricky to determine.
Instead, there's a much easier solution: setting the cutoff to a negative number instead counts the milliseconds forward from the position of the offset. This is where the tempo comes into play; if we know how many beats a syllable is being held at at a particular tempo, we know, then, that the cutoff of a CV should be around that value in the negative.
More precisely, the cutoff of any sample ending in a vowel should be slightly less than the duration of a single syllable + the length of the preutterance. This is because we are not just considering the duration of the syllable, but also anything that's being captured in the syllable before it in the case of VCV. We also want to stop the sample a little bit before the syllable actually ends to avoid instability in the vowel; usually shaving off about 200 ms does the trick, depending on how much vowel we're working with.
To summarize our formula:
So, a CV sample held for 1 beat at 120 BPM winds up with a cutoff of -400. A VCV sample held for 1 beat at 120 BPM winds up with a cutoff of -600.
For transitional VCs, the cutoff will be much shorter, since we're using the consonant as the blending point. For these, we only have around 100 ms of duration to work with, but also much less of the end that needs to be cropped. I find leaving about 50 ms between the preutterance and cutoff is usually good.
Putting this together, we get:
Consonant
The consonant parameter, called the fixed parameter in vLabeler, should fall between the absolute values of the preutterance and cutoff — meaning if the preutterance is 300 and the cutoff is -600, the consonant parameter should be more than 300 and less than 600.
Ideally we want as much as possible of the final phone in the sequence to be stretched/looped by the resampler, so we want the consonant value to be large enough to capture any irregularities at the start of the final phone while still leaving room for that to happen.
For samples ending in vowels, setting this to be 100 to 200 more than the preutterance is a good starting point. For samples ending in consonants, usually we want this to be no more than 25 over than the preutterance since there's not much area to work with.
So, we get something like this:
Offset
Finally, we get to the offset parameter. So far, all of our values have been identical for like-samples, but here is where we finally set them apart.
First, we need to figure out where our utterance actually begins in the .wav file. If using a guideBGM, this is straightforwardly predictable, otherwise, we can use our best guess. Typically, we want at least a beat or so of rest before the utterance to serve as a buffer and make sure none of the initial syllable gets cutoff. My own guideBGMs leave two.
Once again using our BPM to calculate the duration of each beat, we can determine where the first beat of the utterance lands. If we have two beats of rest at 120 BPM, then the first beat of utterance falls at approximately 1000 ms. But before we set the first offset to 1000 and call it a day, we can't forget about our preutterance value. See, the utterance does not truly begin at the first beat; the first vowel hits on the first beat; any consonants uttered at the start of the syllable will fall before that mark.
Thus, the parameter of a CV or VCV that hits exactly on the beat is not the offset, but rather the preutterance, so in these cases offset = position of the current beat - preutterance... in theory. In actuality, I find this is not always very accurate, but it's a good starting point and can be adjusted later after the base has been tested.
For VCs, offset = offset of the following syllable's CV - the VC's preutterance. Again, though, this is not always very accurate to real utterances.
The offsets of subsequent samples will simply be the previous offset + the duration of one syllable. Using these estimates, we end up with:
These aren't exactly the offsets used in my own bases due to the aforementioned inaccuracies, but they're pretty close.
Now that we've completed a whole string of the oto, and we can use this string as a template for creating the rest of the base via the methods discussed earlier.
This tutorial is crossposted from my website. Part 2 covers making bases from finished voicebanks and Part 3 covers making bases using regular expressions.
What is a Base OTO?
A base oto is a template for an UTAU voicebank configuration file, or oto.ini. Essentially, they do the work of splitting up a string into samples ahead of time so that this does not have to be done manually during the configuration process. They also often, but not always, provide numerical values for parameters with fixed values and rough estimates for those which will be adjusted later.
They are not meant to serve as a replacement for manual oto'ing; most samples will still need to be adjusted (human speech is imperfect, after all). Rather, they exist to make the process faster and easier.
There are a lot of benefits to creating a base oto, and they are not terribly difficult to set up. Having the samples already split into their own lines and named takes care of one of the more tedious parts of oto'ing, and if a certain parameter's value is going to be the same for every string, it can save a lot of time to have it already in place. This is especially true if you plan to use the same reclist for multiple voicebanks, multiple pitches in the same voicebank, or to release a reclist publicly for other people's usage.
Things to Keep in Mind
First thing's first, you'll need to understand the reclist you're working with. Especially if it's one you've written yourself, you should already have in mind what samples are going to be pulled from each string and how they're going to be aliased.
Note said:
You should also be familiar with the structure of the oto. Ideally, you should have a general idea of which values will go in the parameters of each sample type, but these can always be adjusted later after testing the base. If you need a refresher, each line of the oto follows this format:
Code:
[file_name].wav=[alias],[offset],[consonant],[cutoff],[preutterance],[overlap]I've colour-coded the parameters to make it a little more obvious what each value is refering to in the visual editor.
Lastly, you'll want to know what tempo the reclist is meant to be recorded at, as this will affect the parameter values, notably the offset and cutoff.
With all of this in mind, you're ready to start building your base.
Making Base OTOs from Scratch
You will need:
- A complete reclist or an unfilled oto.ini from a fully recorded voicebank. Essentially, you just need something that has all of the file names in it.
- A text editor. The default Notepad app will work fine, but one which is able to use regular expressions (regex) and which will allow you to change the character encoding is more efficient. For Windows users, I recommend Notepad++; it's free, open source, and easy to use.
Copy, Paste, Find, Replace
For most reclists, you are going to have a lot of strings which are identical in structure and differ only by what phones are included. As such, it's often more efficient to build the base of one string of each type which can then be duplicated and edited rather than having to manually create every line of the reclist.
Which strings this can be done with will of course depend on the reclist, but it can save a lot of time. The caveat is that if there is a mistake in the initial string, like a typo in the alias, this will also get copied to every other string, so be sure to proofread your work carefully.
For example, let's say we're making a base for a 2-mora CVVC and the majority of our strings look like CV-CVC. Rather than manually writing each line of the reclist, we can build the base for the first string, then copy it for the others. So, we alias the first line like so:
Code:
ka-kak.wav=- ka,,,,,
ka-kak.wav=a k,,,,,
ka-kak.wav=ka,,,,,
ka-kak.wav=a k-,,,,,
Then, we copy+paste it right underneath:
Code:
ka-kak.wav=- ka,,,,,
ka-kak.wav=a k,,,,,
ka-kak.wav=ka,,,,,
ka-kak.wav=a k-,,,,,
ka-kak.wav=- ka,,,,,
ka-kak.wav=a k,,,,,
ka-kak.wav=ka,,,,,
ka-kak.wav=a k-,,,,,
Now, we can highlight the duplicated string, open up the find and replace menu using <CTRL+H>, and replace [a] with [ i]. Make sure that In selection is enabled so that other instances of [a] won't be effected, as well as Match case because UTAU is case-sensitive. Hit Replace All.
Uh-oh, looks like we accidentally changed the [.wav] part of the oto for the new lines. There's an easy way to fix this, however; we repeat the find and replace process on the section by finding [wiv] and replacing it with [wav].
Alternatively, this problem can be avoided altogether by creating a placeholder string which uses characters that won't be found elsewhere in the reclist and using this for creating new strings, for example:
Code:
XY-XYX.wav=- XY,,,,,
XY-XYX.wav=Y X,,,,,
XY-XYX.wav=XY,,,,,
XY-XYX.wav=Y X-,,,,,
But this isn't strictly necessary. Which placeholders are used is obviously going to depend on the specific reclist and string type as well.
When we have all of our vowels taken care of, we can duplicate the entire section and repeat the find and replace process with the next consonant.
This can also be done the other way around for reclists which are organized by vowel first and consonant second, but general idea remains the same; no reason to create extra work for yourself.
Of course, this becomes trickier when dealing with triphones like VCVs, consonant clusters, and generally non-Latin characters, and this whole process is reliant on strings being uniform, but having this in your toolbelt is quite useful when applicable.
Ideally this will also be done with all of the parameters of each line set to avoid even more tedious work, but I wanted to show how to do it before diving into the parameters themselves.
Alias
Before setting any of the parameter values, it's a good idea to set the sample aliases of the string you're working with. This will help you see what types of samples are being pulled from the string and how many there are of each type.
For an unstringed CV reclist, the alias is going to be the same as the file name (or its kana equivalent). Even if they are exactly the same, it's good practice to set the alias anyways, especially if you plan to put the audio files into a subfolder, just to ensure they'll be pulled correctly by the resampler.
For any other type of reclist, you'll want to duplicate the string for as many samples as will be pulled from it. This can be done by copypasting or by hitting <CTRL+D> in Notepad++.
For example, if we have a Japanese VCV string like [ka-ka-ki-ka-ku-ka-N-ka], we would duplicate it 6 times for 7 lines total, one for the initial CV and six for each VCV. Assuming that [ん] is taken care of elsewhere in the reclist, we do not need to create a line for [a ん] here.
Next, fill in each of the aliases. Remember that these go between the equals sign and the first comma, and any whitespace will be read as part of the alias. So, our VCV string ends up looking like this:
Code:
ka-ka-ki-ka-ku-ka-N-ka.wav=- か,,,,,
ka-ka-ki-ka-ku-ka-N-ka.wav=a か,,,,,
ka-ka-ki-ka-ku-ka-N-ka.wav=a き,,,,,
ka-ka-ki-ka-ku-ka-N-ka.wav=i か,,,,,
ka-ka-ki-ka-ku-ka-N-ka.wav=a く,,,,,
ka-ka-ki-ka-ku-ka-N-ka.wav=u か,,,,,
ka-ka-ki-ka-ku-ka-N-ka.wav=n か,,,,,
For an English CVVC string like [A-pA-bA-tA-dA-kA-gA], we get something like this, with 6 VCs and 6 CVs making for a total of 12 lines per string:
Code:
A-pA-bA-tA-dA-kA-gA.wav=A p,,,,,
A-pA-bA-tA-dA-kA-gA.wav=A b,,,,,
A-pA-bA-tA-dA-kA-gA.wav=A t,,,,,
A-pA-bA-tA-dA-kA-gA.wav=A d,,,,,
A-pA-bA-tA-dA-kA-gA.wav=A k,,,,,
A-pA-bA-tA-dA-kA-gA.wav=A g,,,,,
A-pA-bA-tA-dA-kA-gA.wav=pA,,,,,
A-pA-bA-tA-dA-kA-gA.wav=bA,,,,,
A-pA-bA-tA-dA-kA-gA.wav=tA,,,,,
A-pA-bA-tA-dA-kA-gA.wav=dA,,,,,
A-pA-bA-tA-dA-kA-gA.wav=kA,,,,,
A-pA-bA-tA-dA-kA-gA.wav=gA,,,,,
It's a good idea to generally keep your aliases in sequential order, as this will help you keep track of where you are in the audio file and make it more obvious if your offsets are out of whack, but as we see with the CVVC strings, we don't have to be strict about it. In that case, I prefer to group like-samples together to make for easier oto'ing, so that way you won't have to be constantly alternating between VCs and CVs. This is a matter of personal preference for organization, however; the order of the lines in the oto doesn't actually matter.
For some base otos, the process stops here, but most of the time, you'll want to fill in some of the numerical values as well.
Timing
As mentioned, in order to figure out our approximate parameter values, we need to know how the samples are going to be timed in the recordings. Most importantly, we need need to know the tempo (BPM) the strings will be recorded at, as this will tell us the duration of every beat and by extension how long every syllable will be held.
The oto is measured in milliseconds (ms), and thus voicebanks are usually recorded at tempos where every beat's duration is nice number to work with. Here's a handy chart:
| Tempo | 1/4 beat | 1/2 beat | 1 beat | 2 beats | 4 beats | 8 beats |
|---|---|---|---|---|---|---|
| 100 BPM | 150 ms | 300 ms | 600 ms | 1200 ms | 2400 ms | 4800 ms |
| 120 BPM | 125 ms | 250 ms | 500 ms | 1000 ms | 2000 ms | 4000 ms |
| 150 BPM | 100 ms | 200 ms | 400 ms | 800 ms | 1600 ms | 3200 ms |
A longer vowel gives the config and by extension the resampler more to work with, but holding a note too long can be more difficult for the vocalist or start to create irregularities. A good note length is usually somewhere between 400 and 2400 ms. As such, voicebanks are usually recorded with each syllable held from 1 to 4 beats at somewhere between 100 and 150 BPM.
Note said:
Using this, we can figure out how far apart each of our samples will be in the oto; for instance, if we're recording at 120 BPM and holding each syllable for 1 beat, then each syllable in the string is going to be 500 ms apart. This is what we'll use to determine our parameter values.
Preutterance and Overlap
It may seem counter-intuitive to start with these as they are are at the end of the oto line, but these values are often the easiest to predict, and are additionally used for determining what other parameters should be set to.
For samples like VCVs, VCs, and VVs as well as in some cases initial CVs, these are going to have fixed values, meaning that they won't be changed during configuration. How long the preutterance is will be somewhat dependent on how much of the previous vowel we have to work with and how long we want the transition to last from note to note. The overlap will usually be 1/4th or 1/3rd the length of the preutterance, and should not be more than half of it.
For a longer transition with more overlap (typical for VCVs), I use 300 for the preutterance and 100 for overlap, and for a shorter transition with less overlap (typical for VCs), I use 200 for the preutterance and 50 for the overlap.
Note said:
For typical CVs, I find that a preutterance of 100 and an overlap of 25 is a good starting point, as a typical consonant is going to fall somewhere around that length, but these can be refined later if they're too long or short for a particular phone. For medial CCs, I use a preutterance of 75 and an overlap of 25 since slightly less of the consonant is included.
So, our examples from before now look like this:
Code:
ka-ka-ki-ka-ku-ka-N-ka.wav=- か,,,,300,100
ka-ka-ki-ka-ku-ka-N-ka.wav=a か,,,,300,100
ka-ka-ki-ka-ku-ka-N-ka.wav=a き,,,,300,100
ka-ka-ki-ka-ku-ka-N-ka.wav=i か,,,,300,100
ka-ka-ki-ka-ku-ka-N-ka.wav=a く,,,,300,100
ka-ka-ki-ka-ku-ka-N-ka.wav=u か,,,,300,100
ka-ka-ki-ka-ku-ka-N-ka.wav=n か,,,,300,100
Code:
A-pA-bA-tA-dA-kA-gA.wav=A p,,,,200,50
A-pA-bA-tA-dA-kA-gA.wav=A b,,,,200,50
A-pA-bA-tA-dA-kA-gA.wav=A t,,,,200,50
A-pA-bA-tA-dA-kA-gA.wav=A d,,,,200,50
A-pA-bA-tA-dA-kA-gA.wav=A k,,,,200,50
A-pA-bA-tA-dA-kA-gA.wav=A g,,,,200,50
A-pA-bA-tA-dA-kA-gA.wav=pA,,,,100,25
A-pA-bA-tA-dA-kA-gA.wav=bA,,,,100,25
A-pA-bA-tA-dA-kA-gA.wav=tA,,,,100,25
A-pA-bA-tA-dA-kA-gA.wav=dA,,,,100,25
A-pA-bA-tA-dA-kA-gA.wav=kA,,,,100,25
A-pA-bA-tA-dA-kA-gA.wav=gA,,,,100,25
Cutoff
Next, let's determine the cutoff. A cutoff with a value of 0 would tell UTAU to stop the sample at the very end of the .wav file, which is almost never what we want. A cutoff with a positive value counts backwards from the end of the file to the beginning. We could, theoretically, calculate exactly where each of our cutoffs should be relative to that, but especially if you're not recording with a guideBGM, that can be tricky to determine.
Instead, there's a much easier solution: setting the cutoff to a negative number instead counts the milliseconds forward from the position of the offset. This is where the tempo comes into play; if we know how many beats a syllable is being held at at a particular tempo, we know, then, that the cutoff of a CV should be around that value in the negative.
More precisely, the cutoff of any sample ending in a vowel should be slightly less than the duration of a single syllable + the length of the preutterance. This is because we are not just considering the duration of the syllable, but also anything that's being captured in the syllable before it in the case of VCV. We also want to stop the sample a little bit before the syllable actually ends to avoid instability in the vowel; usually shaving off about 200 ms does the trick, depending on how much vowel we're working with.
To summarize our formula:
Code:
cutoff = (syllable duration + preutterance - 200) * -1So, a CV sample held for 1 beat at 120 BPM winds up with a cutoff of -400. A VCV sample held for 1 beat at 120 BPM winds up with a cutoff of -600.
For transitional VCs, the cutoff will be much shorter, since we're using the consonant as the blending point. For these, we only have around 100 ms of duration to work with, but also much less of the end that needs to be cropped. I find leaving about 50 ms between the preutterance and cutoff is usually good.
Putting this together, we get:
Code:
ka-ka-ki-ka-ku-ka-N-ka.wav=- か,,,-600,300,100
ka-ka-ki-ka-ku-ka-N-ka.wav=a か,,,-600,300,100
ka-ka-ki-ka-ku-ka-N-ka.wav=a き,,,-600,300,100
ka-ka-ki-ka-ku-ka-N-ka.wav=i か,,,-600,300,100
ka-ka-ki-ka-ku-ka-N-ka.wav=a く,,,-600,300,100
ka-ka-ki-ka-ku-ka-N-ka.wav=u か,,,-600,300,100
ka-ka-ki-ka-ku-ka-N-ka.wav=n か,,,-600,300,100
Code:
A-pA-bA-tA-dA-kA-gA.wav=A p,,,-250,200,50
A-pA-bA-tA-dA-kA-gA.wav=A b,,,-250,200,50
A-pA-bA-tA-dA-kA-gA.wav=A t,,,-250,200,50
A-pA-bA-tA-dA-kA-gA.wav=A d,,,-250,200,50
A-pA-bA-tA-dA-kA-gA.wav=A k,,,-250,200,50
A-pA-bA-tA-dA-kA-gA.wav=A g,,,-250,200,50
A-pA-bA-tA-dA-kA-gA.wav=pA,,,-400,100,25
A-pA-bA-tA-dA-kA-gA.wav=bA,,,-400,100,25
A-pA-bA-tA-dA-kA-gA.wav=tA,,,-400,100,25
A-pA-bA-tA-dA-kA-gA.wav=dA,,,-400,100,25
A-pA-bA-tA-dA-kA-gA.wav=kA,,,-400,100,25
A-pA-bA-tA-dA-kA-gA.wav=gA,,,-400,100,25
Consonant
The consonant parameter, called the fixed parameter in vLabeler, should fall between the absolute values of the preutterance and cutoff — meaning if the preutterance is 300 and the cutoff is -600, the consonant parameter should be more than 300 and less than 600.
Ideally we want as much as possible of the final phone in the sequence to be stretched/looped by the resampler, so we want the consonant value to be large enough to capture any irregularities at the start of the final phone while still leaving room for that to happen.
For samples ending in vowels, setting this to be 100 to 200 more than the preutterance is a good starting point. For samples ending in consonants, usually we want this to be no more than 25 over than the preutterance since there's not much area to work with.
So, we get something like this:
Code:
ka-ka-ki-ka-ku-ka-N-ka.wav=- か,,400,-600,300,100
ka-ka-ki-ka-ku-ka-N-ka.wav=a か,,400,-600,300,100
ka-ka-ki-ka-ku-ka-N-ka.wav=a き,,400,-600,300,100
ka-ka-ki-ka-ku-ka-N-ka.wav=i か,,400,-600,300,100
ka-ka-ki-ka-ku-ka-N-ka.wav=a く,,400,-600,300,100
ka-ka-ki-ka-ku-ka-N-ka.wav=u か,,400,-600,300,100
ka-ka-ki-ka-ku-ka-N-ka.wav=n か,,400,-600,300,100
Code:
A-pA-bA-tA-dA-kA-gA.wav=A p,,225,-250,200,50
A-pA-bA-tA-dA-kA-gA.wav=A b,,225,-250,200,50
A-pA-bA-tA-dA-kA-gA.wav=A t,,225,-250,200,50
A-pA-bA-tA-dA-kA-gA.wav=A d,,225,-250,200,50
A-pA-bA-tA-dA-kA-gA.wav=A k,,225,-250,200,50
A-pA-bA-tA-dA-kA-gA.wav=A g,,225,-250,200,50
A-pA-bA-tA-dA-kA-gA.wav=pA,,250,-400,100,25
A-pA-bA-tA-dA-kA-gA.wav=bA,,250,-400,100,25
A-pA-bA-tA-dA-kA-gA.wav=tA,,250,-400,100,25
A-pA-bA-tA-dA-kA-gA.wav=dA,,250,-400,100,25
A-pA-bA-tA-dA-kA-gA.wav=kA,,250,-400,100,25
A-pA-bA-tA-dA-kA-gA.wav=gA,,250,-400,100,25
Offset
Finally, we get to the offset parameter. So far, all of our values have been identical for like-samples, but here is where we finally set them apart.
First, we need to figure out where our utterance actually begins in the .wav file. If using a guideBGM, this is straightforwardly predictable, otherwise, we can use our best guess. Typically, we want at least a beat or so of rest before the utterance to serve as a buffer and make sure none of the initial syllable gets cutoff. My own guideBGMs leave two.
Once again using our BPM to calculate the duration of each beat, we can determine where the first beat of the utterance lands. If we have two beats of rest at 120 BPM, then the first beat of utterance falls at approximately 1000 ms. But before we set the first offset to 1000 and call it a day, we can't forget about our preutterance value. See, the utterance does not truly begin at the first beat; the first vowel hits on the first beat; any consonants uttered at the start of the syllable will fall before that mark.
Thus, the parameter of a CV or VCV that hits exactly on the beat is not the offset, but rather the preutterance, so in these cases offset = position of the current beat - preutterance... in theory. In actuality, I find this is not always very accurate, but it's a good starting point and can be adjusted later after the base has been tested.
For VCs, offset = offset of the following syllable's CV - the VC's preutterance. Again, though, this is not always very accurate to real utterances.
The offsets of subsequent samples will simply be the previous offset + the duration of one syllable. Using these estimates, we end up with:
Code:
ka-ka-ki-ka-ku-ka-N-ka.wav=- か,700,400,-600,300,100
ka-ka-ki-ka-ku-ka-N-ka.wav=a か,1200,400,-600,300,100
ka-ka-ki-ka-ku-ka-N-ka.wav=a き,1700,400,-600,300,100
ka-ka-ki-ka-ku-ka-N-ka.wav=i か,2200,400,-600,300,100
ka-ka-ki-ka-ku-ka-N-ka.wav=a く,2700,400,-600,300,100
ka-ka-ki-ka-ku-ka-N-ka.wav=u か,3200,400,-600,300,100
ka-ka-ki-ka-ku-ka-N-ka.wav=n か,3700,400,-600,300,100
Code:
A-pA-bA-tA-dA-kA-gA.wav=A p,1200,225,-250,200,50
A-pA-bA-tA-dA-kA-gA.wav=A b,1700,225,-250,200,50
A-pA-bA-tA-dA-kA-gA.wav=A t,2200,225,-250,200,50
A-pA-bA-tA-dA-kA-gA.wav=A d,2700,225,-250,200,50
A-pA-bA-tA-dA-kA-gA.wav=A k,3200,225,-250,200,50
A-pA-bA-tA-dA-kA-gA.wav=A g,3700,225,-250,200,50
A-pA-bA-tA-dA-kA-gA.wav=pA,1400,250,-400,100,25
A-pA-bA-tA-dA-kA-gA.wav=bA,1900,250,-400,100,25
A-pA-bA-tA-dA-kA-gA.wav=tA,2400,250,-400,100,25
A-pA-bA-tA-dA-kA-gA.wav=dA,2900,250,-400,100,25
A-pA-bA-tA-dA-kA-gA.wav=kA,3400,250,-400,100,25
A-pA-bA-tA-dA-kA-gA.wav=gA,3900,250,-400,100,25
These aren't exactly the offsets used in my own bases due to the aforementioned inaccuracies, but they're pretty close.
Now that we've completed a whole string of the oto, and we can use this string as a template for creating the rest of the base via the methods discussed earlier.
