This guide was originally written in 2014 and rewritten in 2015, as a resource for newbies who received otoing services from this thread.
http://utaforum.net/threads/services-for-newbies.8918/
I am now making this publicly available to the community at large, because I forgot to post it earlier. Questions from the new and feedback from the experienced is welcome. If you are working on your first UTAU voicebank, you can have your bank OTO'd for free as an example of how this guide works.
The OTO windows (Windows, UTAU)
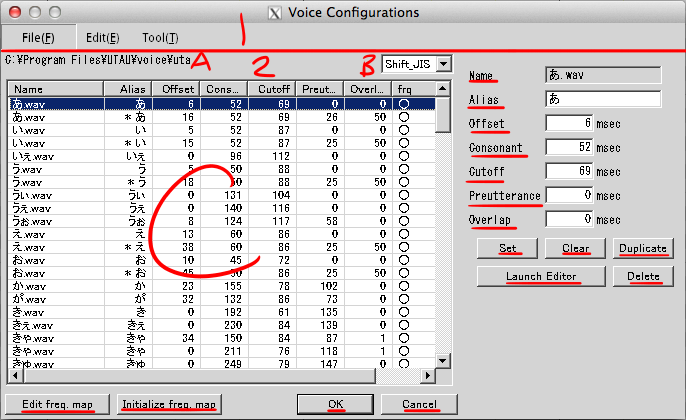
This window can be accessed by any one of two ways.
A - File path of currently open voicebank
B - Encoding of the oto.ini file
C - List of all oto entries
Name - Filename of entry
Alias - An alternate name for the file that can be used in UST lyrics. If the sample is duplicated, each entry can have different aliases and parameters
Offset - Time in milliseconds relative to file start, corresponds to first/left blue highlight in sample window
Fixed region - Time in milliseconds relative to offset, corresponds to pink highlight in sample window
Cutoff - Time in milliseconds relative to file end (if positive) or offset (if negative), corresponds to last/right blue highlight in sample window
Preutterance - Time in milliseconds relative to offset, corresponds to red line in sample window
Overlap - Time in milliseconds relative to offset, corresponds to green line in sample window
Set - If parameters were edited, this button sets them into the list of entries
Clear - Erases all parameters from the entry
Duplicate - The entry
Launch Editor - Opens sample window for the entry
Delete - The entry from the oto
Edit freq map - Edit FRQ, which is a file recording the pitch of every point in the sample
Initialize freq map - Regenerate FRQ with the default resampler
OK - Saves all parameters and closes OTO window
Cancel - Doesn’t save edits and closes OTO window

This window can be accessed by any one of three ways.
B - Horizontal zoom in, horizontal zoom out, doubleclick P to hear sample, and s to switch to spectrum view (adds * for intensity slider)
C - Offset - Cuts off all of the sample in the highlighted area
D - Fixed region - Determines the area to be unaffected by stretching notes
E - White region - Determines the area to be affected by stretching notes
F - Cutoff - Cuts off all of the sample in the highlighted area
G - Overlap - Determines how much of the sample to be crossfaded with the previous note
H - Preutterance - Determines how much of the sample is before the beginning of a note
I - Previous/next entry
J - Close sample window
The OTO window (Mac, UTAU-Synth)
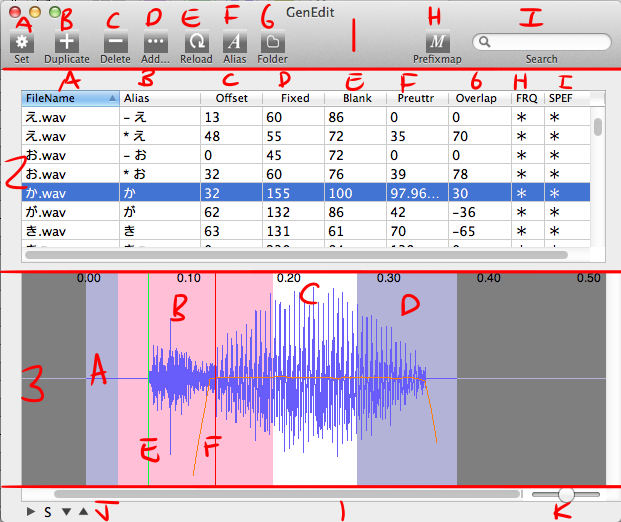
This window can be accessed by any one of three ways.
A - Set - Saves all configurations to oto_ini.txt (and/or oto.ini, depending on settings)
B - Duplicate - Create a duplicate of selected oto entry
C - Delete - Remove entry from list
D - Add - Add entry to list
E - Reload - Reread the oto_ini.txt or oto.ini file for parameters
F - Alias - Set the Alias parameter of every entry to the same as the wav file name
G - Folder - View the .utau file in its folder
H - Prefixmap - Used for configuring multipitch voicebanks
I - Search
J - Play the sample - Cycle through waveform, half waveform half spectrum, and spectrum display - Decrease spectrum intensity - Increase spectrum intensity
K - Horizontal zoom of sample view
Section 2
A - Filename
B - Alias - An alternate name for the file that can be used in UST lyrics. If the sample is duplicated, each entry can have different aliases and parameters
C - Offset - Time in milliseconds relative to file start, corresponds to first/left blue highlight in sample view
D - Fixed - Time in milliseconds relative to offset, corresponds to pink highlight in sample view
E - Blank - Time in milliseconds relative to file end (if positive) or offset (if negative), corresponds to last/right blue highlight in sample view
F - Preutterance - Time in milliseconds relative to offset, corresponds to red line in sample view
G - Overlap - Time in milliseconds relative to offset, corresponds to green line in sample view
H - Star indicates presence of FRQ file for that entry. Necessary for rendering.
I - Star indicates presence of SPEF file for that entry. Necessary for rendering.
B through G can be double clicked and typed into.
Each entry can be right clicked to show a menu for updating the SPEF, FRQ, or both.
Section 3
A - Offset - Cuts off all of the sample in the highlighted area
B - Fixed - Determines the area to be unaffected by stretching notes
C - White region - Determines the area to be affected by stretching notes
D - Blank - Cuts off all of the sample in the highlighted area
E - Overlap - Determines how much of the sample to be crossfaded with the previous note
F - Preutterance - Determines how much of the sample is before the beginning of a note
How to OTO
Open the OTO window (and hit Set if using UTAU-Synth) then close it. This will create the oto.ini file.
Open the oto.ini file in a text editor. (Any one is fine, Notepad or Textedit are the default ones for Windows and macOS respectively.)
Find and replace [,,,,,] with [,,100,,60,30]. In fact, it's only necessary to replace [,,,,,] with [,,,,,30] but setting the other numbers will move other parameters, making them easier to click and drag when adjusting later on.


Save this. Go back to UTAU and reopen the OTO window, then reload it. The numbers should appear in every entry of the OTO.
Now you’re ready to go to the sample window and edit everything.
For all samples
If you are using the windows version of UTAU and plan to use a resampler that loops, like tn_fnds, you will need to adjust the fixed region and cutoff parameters for the white region to loop smoothly.
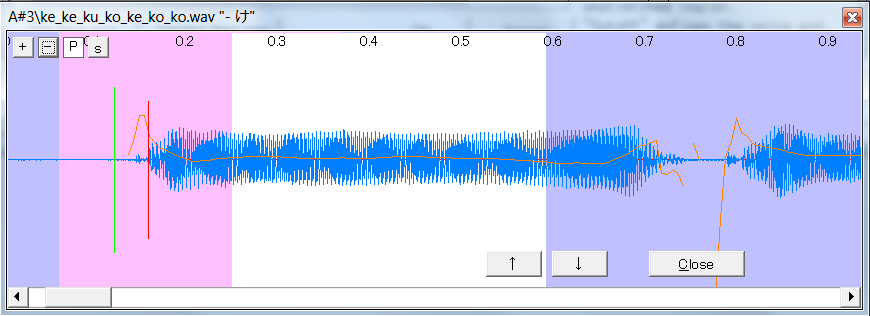
[screenshot from Cdra’s otoing guide]
Vowels
Manually set the preutterance and overlap to 50.
The white region covers the entire consistent area.
Drag the pink all the way left.
Make sure the right blank covers the fadeout.

Consonant-Vowel
Move the offset to the appropriate place for the consonant. (Details later)
Move the preutterance to the end of the consonant. (See exception for glides clusters/blends with y and w)
The fixed region should cover the entire beginning until the vowel is consistent.
Make sure the right blank covers the fadeout.

Hard Consonants
Plosives, Affricates, and Taps
(ex. k, g, t, d, b, p, ts, ch, j, japanese r)
Move the offset so that the overlap falls before the beginning of the consonant.

For the consonants K, T, and P, move the offset so that the beginning of the consonant falls between the overlap and the preutterance (ie. around 45msec from offset). These are unvoiced plosives, and have more silence before them. Once placed, adjust the preutterance to the correct location.
step 1

step 2

Soft consonants
Fricatives and Nasals
(ex. s, z, h, v, f, th, n, m)
Move the offset to the beginning of the consonant.
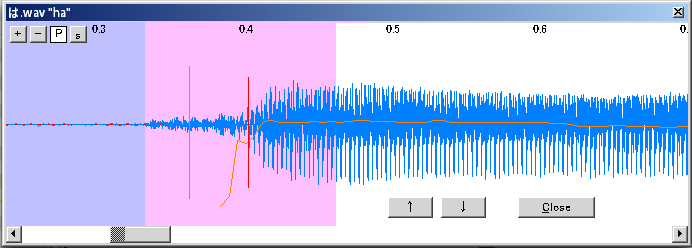
Smooth consonants
Liquids and glides
(ex. l, english r, y, w)
Move the offset to the beginning of the consonant.
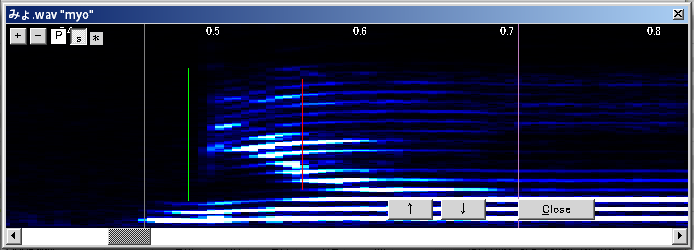
Switch the view to spectrum and look for a sloping shape.
(It slopes down for Y, and up for W)
Put the preutterance at the end of it.
And finally, don’t forget to save your OTO by pressing OK (UTAU) or Set (UTAU-Synth).
http://utaforum.net/threads/services-for-newbies.8918/
I am now making this publicly available to the community at large, because I forgot to post it earlier. Questions from the new and feedback from the experienced is welcome. If you are working on your first UTAU voicebank, you can have your bank OTO'd for free as an example of how this guide works.
The OTO windows (Windows, UTAU)
This window can be accessed by any one of two ways.
- Going to Tools (T) then Voice Bank Settings (S)
- Pressing Ctrl + G on your keyboard
- File
- Open Configuration - Select an .ini file to edit
- Save as - Save current configurations to an .ini file
- Reload - Rereads parameters from the oto.ini file
- Open folder - Opens the voicebank folder in Windows Explorer
- Open Another Voice Bank - Select another voicebank folder to edit
- Save And Exit - From this OTO window
- Edit
- Edit Parameters with Editor - Opens sample window
- Clear - Erases all parameters from selected entries
- Duplicate - The selected entry
- Delete - The selected entry
- Create a new entry - Enter a file name to add it to the oto
- Edit frequency table - Edit FRQ, which is a file recording the pitch of every point in the sample
- Initialize frequency table - Regenerate FRQ with default resampler
- Select Multi - Enables ability to shift+click and select multiple entries
- (kanji) (A) - If above is enabled, selects all entries
- Tool
- Reload region - Rereads parameters from the oto.ini file for selected entries
A - File path of currently open voicebank
B - Encoding of the oto.ini file
C - List of all oto entries
Name - Filename of entry
Alias - An alternate name for the file that can be used in UST lyrics. If the sample is duplicated, each entry can have different aliases and parameters
Offset - Time in milliseconds relative to file start, corresponds to first/left blue highlight in sample window
Fixed region - Time in milliseconds relative to offset, corresponds to pink highlight in sample window
Cutoff - Time in milliseconds relative to file end (if positive) or offset (if negative), corresponds to last/right blue highlight in sample window
Preutterance - Time in milliseconds relative to offset, corresponds to red line in sample window
Overlap - Time in milliseconds relative to offset, corresponds to green line in sample window
Set - If parameters were edited, this button sets them into the list of entries
Clear - Erases all parameters from the entry
Duplicate - The entry
Launch Editor - Opens sample window for the entry
Delete - The entry from the oto
Edit freq map - Edit FRQ, which is a file recording the pitch of every point in the sample
Initialize freq map - Regenerate FRQ with the default resampler
OK - Saves all parameters and closes OTO window
Cancel - Doesn’t save edits and closes OTO window
This window can be accessed by any one of three ways.
- From the OTO window, selecting Edit then Edit Parameters with Editor
- From the OTO window, clicking on Launch Editor
- From the UTAU window, pressing Ctrl + G on your keyboard while selecting one note
B - Horizontal zoom in, horizontal zoom out, doubleclick P to hear sample, and s to switch to spectrum view (adds * for intensity slider)
C - Offset - Cuts off all of the sample in the highlighted area
D - Fixed region - Determines the area to be unaffected by stretching notes
E - White region - Determines the area to be affected by stretching notes
F - Cutoff - Cuts off all of the sample in the highlighted area
G - Overlap - Determines how much of the sample to be crossfaded with the previous note
H - Preutterance - Determines how much of the sample is before the beginning of a note
I - Previous/next entry
J - Close sample window
The OTO window (Mac, UTAU-Synth)
This window can be accessed by any one of three ways.
- Clicking on the voicebank icon in the top left and selecting “Voicebank Settings…” (second option) from the menu
- Going to Tools (fifth option in top bar) and then Voicebank Settings (sixth option)
- Pressing Command + G on your keyboard
A - Set - Saves all configurations to oto_ini.txt (and/or oto.ini, depending on settings)
B - Duplicate - Create a duplicate of selected oto entry
C - Delete - Remove entry from list
D - Add - Add entry to list
E - Reload - Reread the oto_ini.txt or oto.ini file for parameters
F - Alias - Set the Alias parameter of every entry to the same as the wav file name
G - Folder - View the .utau file in its folder
H - Prefixmap - Used for configuring multipitch voicebanks
I - Search
J - Play the sample - Cycle through waveform, half waveform half spectrum, and spectrum display - Decrease spectrum intensity - Increase spectrum intensity
K - Horizontal zoom of sample view
Section 2
A - Filename
B - Alias - An alternate name for the file that can be used in UST lyrics. If the sample is duplicated, each entry can have different aliases and parameters
C - Offset - Time in milliseconds relative to file start, corresponds to first/left blue highlight in sample view
D - Fixed - Time in milliseconds relative to offset, corresponds to pink highlight in sample view
E - Blank - Time in milliseconds relative to file end (if positive) or offset (if negative), corresponds to last/right blue highlight in sample view
F - Preutterance - Time in milliseconds relative to offset, corresponds to red line in sample view
G - Overlap - Time in milliseconds relative to offset, corresponds to green line in sample view
H - Star indicates presence of FRQ file for that entry. Necessary for rendering.
I - Star indicates presence of SPEF file for that entry. Necessary for rendering.
B through G can be double clicked and typed into.
Each entry can be right clicked to show a menu for updating the SPEF, FRQ, or both.
Section 3
A - Offset - Cuts off all of the sample in the highlighted area
B - Fixed - Determines the area to be unaffected by stretching notes
C - White region - Determines the area to be affected by stretching notes
D - Blank - Cuts off all of the sample in the highlighted area
E - Overlap - Determines how much of the sample to be crossfaded with the previous note
F - Preutterance - Determines how much of the sample is before the beginning of a note
How to OTO
Open the OTO window (and hit Set if using UTAU-Synth) then close it. This will create the oto.ini file.
Open the oto.ini file in a text editor. (Any one is fine, Notepad or Textedit are the default ones for Windows and macOS respectively.)
Find and replace [,,,,,] with [,,100,,60,30]. In fact, it's only necessary to replace [,,,,,] with [,,,,,30] but setting the other numbers will move other parameters, making them easier to click and drag when adjusting later on.
Save this. Go back to UTAU and reopen the OTO window, then reload it. The numbers should appear in every entry of the OTO.
Now you’re ready to go to the sample window and edit everything.
For all samples
If you are using the windows version of UTAU and plan to use a resampler that loops, like tn_fnds, you will need to adjust the fixed region and cutoff parameters for the white region to loop smoothly.
[screenshot from Cdra’s otoing guide]
Vowels
Manually set the preutterance and overlap to 50.
The white region covers the entire consistent area.
Drag the pink all the way left.
Make sure the right blank covers the fadeout.
Consonant-Vowel
Move the offset to the appropriate place for the consonant. (Details later)
Move the preutterance to the end of the consonant. (See exception for glides clusters/blends with y and w)
The fixed region should cover the entire beginning until the vowel is consistent.
Make sure the right blank covers the fadeout.
Hard Consonants
Plosives, Affricates, and Taps
(ex. k, g, t, d, b, p, ts, ch, j, japanese r)
Move the offset so that the overlap falls before the beginning of the consonant.
For the consonants K, T, and P, move the offset so that the beginning of the consonant falls between the overlap and the preutterance (ie. around 45msec from offset). These are unvoiced plosives, and have more silence before them. Once placed, adjust the preutterance to the correct location.
step 1
step 2
Soft consonants
Fricatives and Nasals
(ex. s, z, h, v, f, th, n, m)
Move the offset to the beginning of the consonant.
Smooth consonants
Liquids and glides
(ex. l, english r, y, w)
Move the offset to the beginning of the consonant.
Switch the view to spectrum and look for a sloping shape.
(It slopes down for Y, and up for W)
Put the preutterance at the end of it.
And finally, don’t forget to save your OTO by pressing OK (UTAU) or Set (UTAU-Synth).


